> For the complete documentation index, see [llms.txt](https://docs.lyzi.io/llms.txt). Markdown versions of documentation pages are available by appending `.md` to page URLs; this page is available as [Markdown](https://docs.lyzi.io/en/merchant/backoffice.md).
# Backoffice
## **Dashboard**
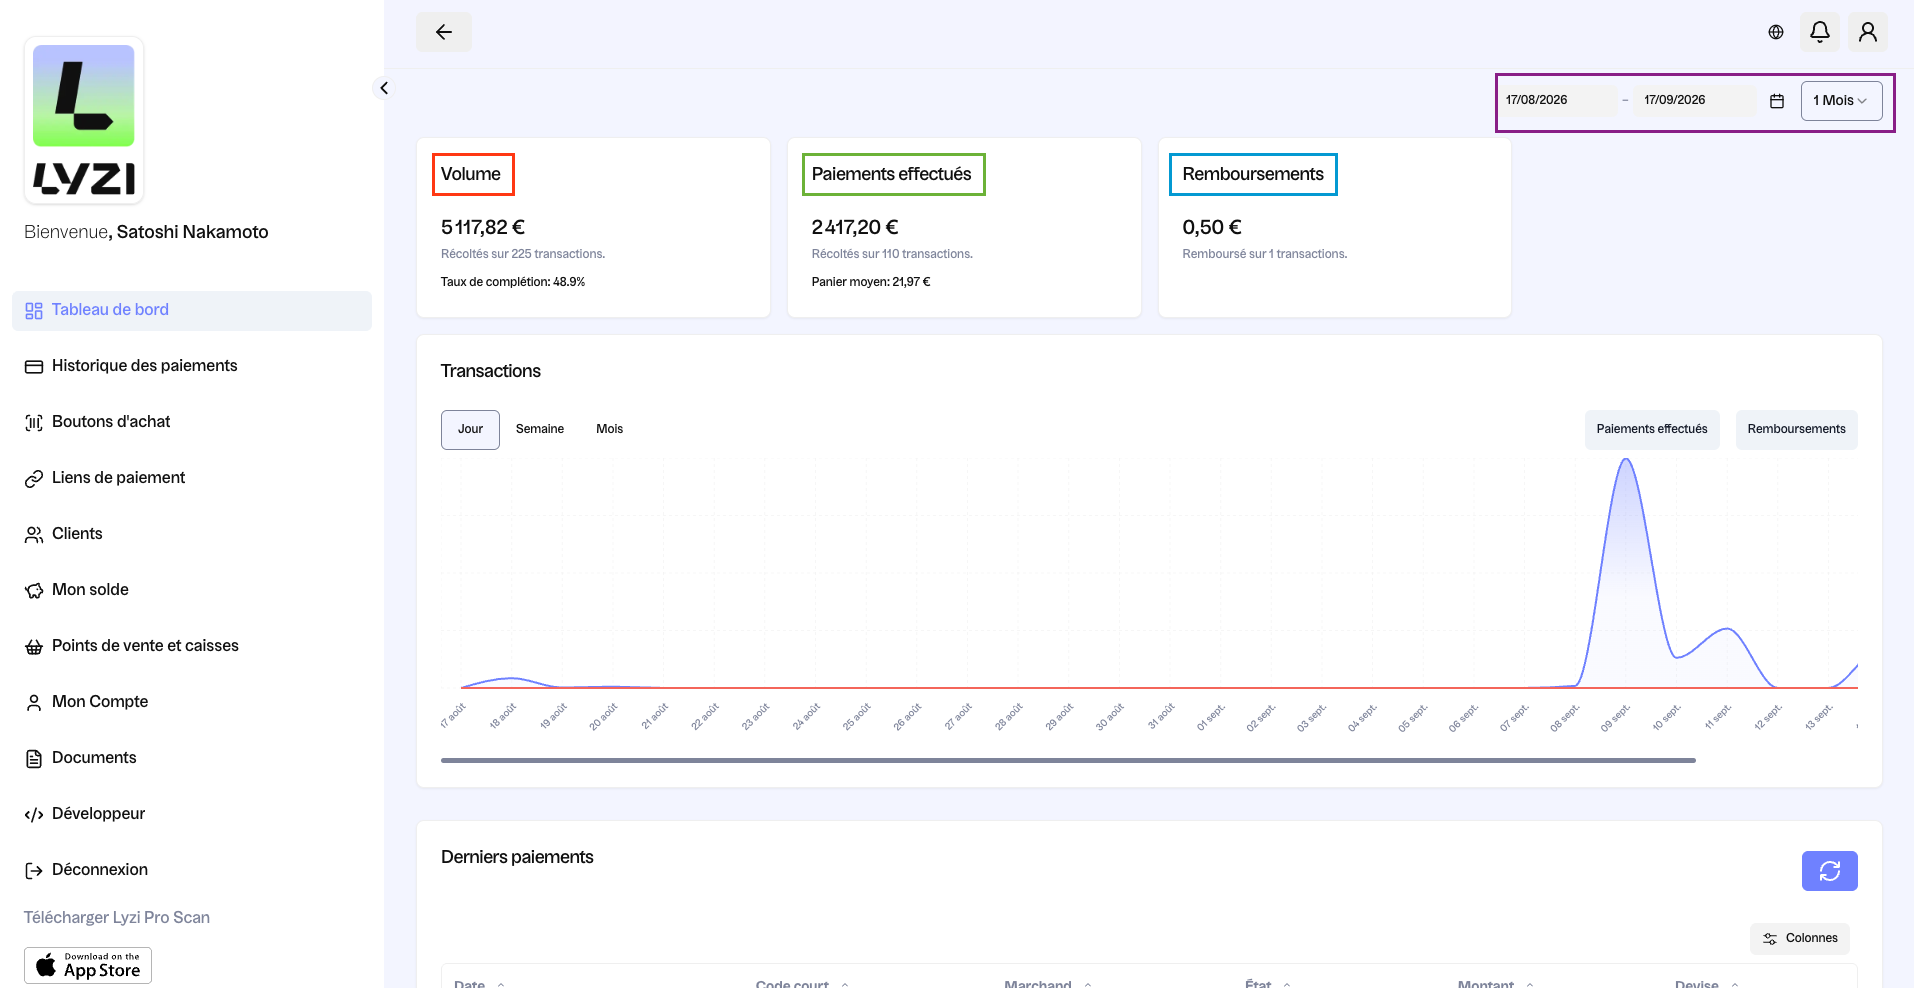
On your dashboard, you'll find a summary of your activity, including volume (see red box), payments made (see green box) and refunds (see blue box). These figures are expressed in euros (€).
You can track the evolution of this data by modifying the time interval (see purple box): from 1 day to 5 years, according to the desired period.
Continuing to scroll down to the bottom of the page, you'll see the latest payments made, accompanied by the following information: date, short code, merchant, transaction status, amount and currency.
## **Payment History**
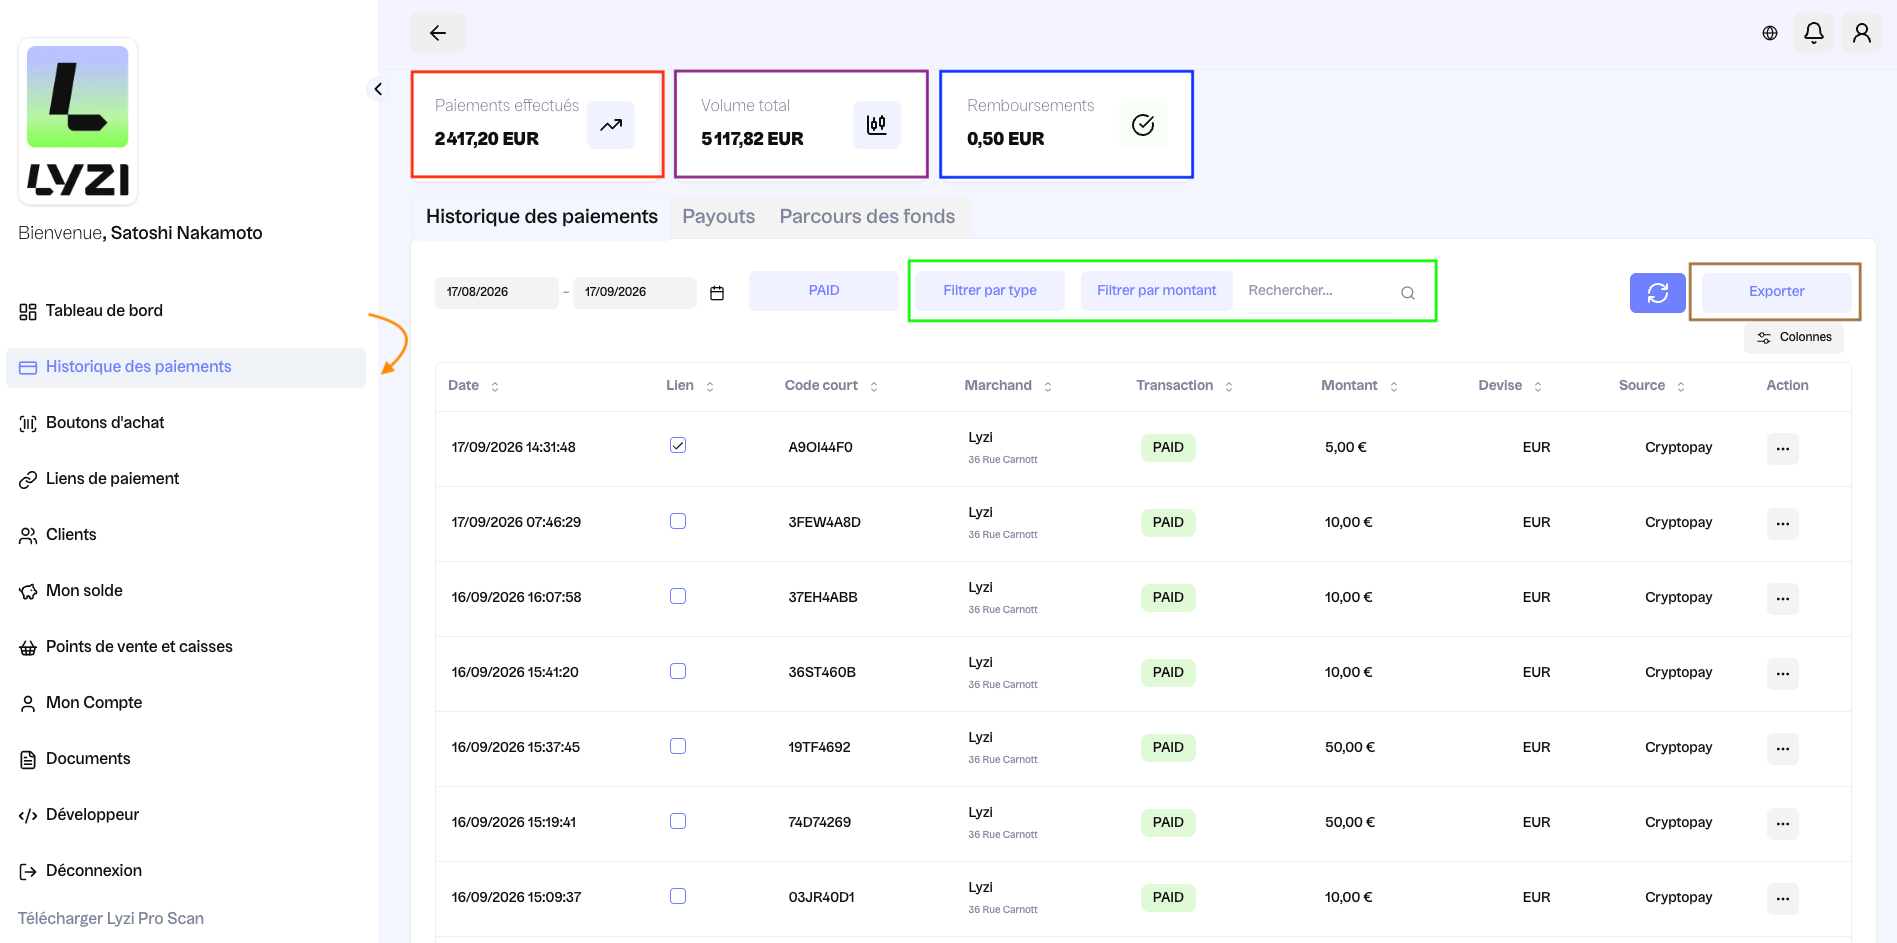
On the "Payment History" page, you have access to payments made (see red box), completed refunds (see blue box) as well as the total volume (see purple box).
Just below, the payment history is displayed by default in chronological order, with the most recent transactions at the top of the list.
Filters are available to quickly find a specific transaction, based on amount, transaction type (direct or via link), or using the search bar (see green box).
It's also possible to export this data in Excel format by clicking "Export" (see in black).
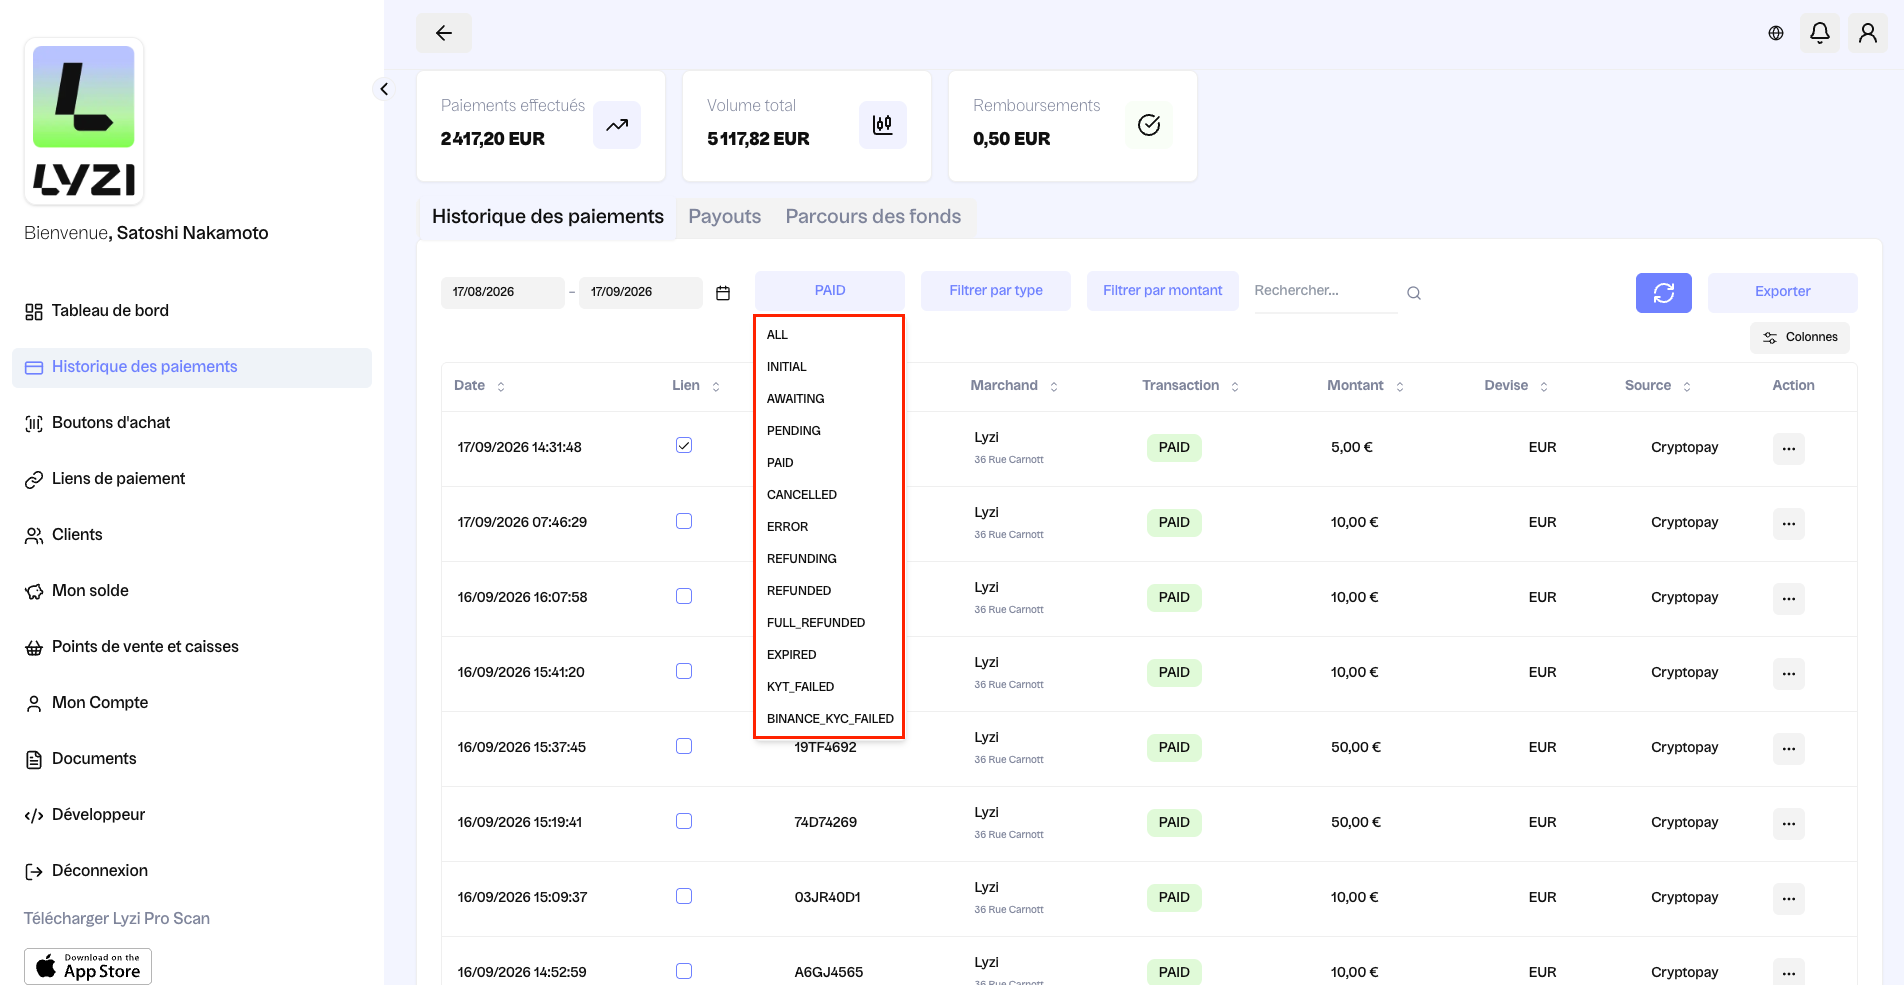
Attached (see red box), the different statuses concerning each transaction (completed or not).
* **INITIAL** : Transaction created and ready to be paid
* **PENDING** : Transaction awaiting user payment
* **AWAITING** : Transaction undergoing internal validation
* **PAID** : Transaction completed and validated
* **CANCELLED** : Cancelled by the customer or following a payment issue
* **ERROR** : Process error to be handled with support
* **EXPIRED** : Transaction expired
* **REFUNDING** : Refund awaiting Lyzi validation
* **REFUNDED** : Refund completed
* **FULL\_REFUNDED** : The total amount has been refunded to the customer
* **KYT\_FAILED** : The verification of their wallet was not validated. The transaction must be analyzed by the Lyzi team.
## **Buy Button: Universal button for your e-commerce**
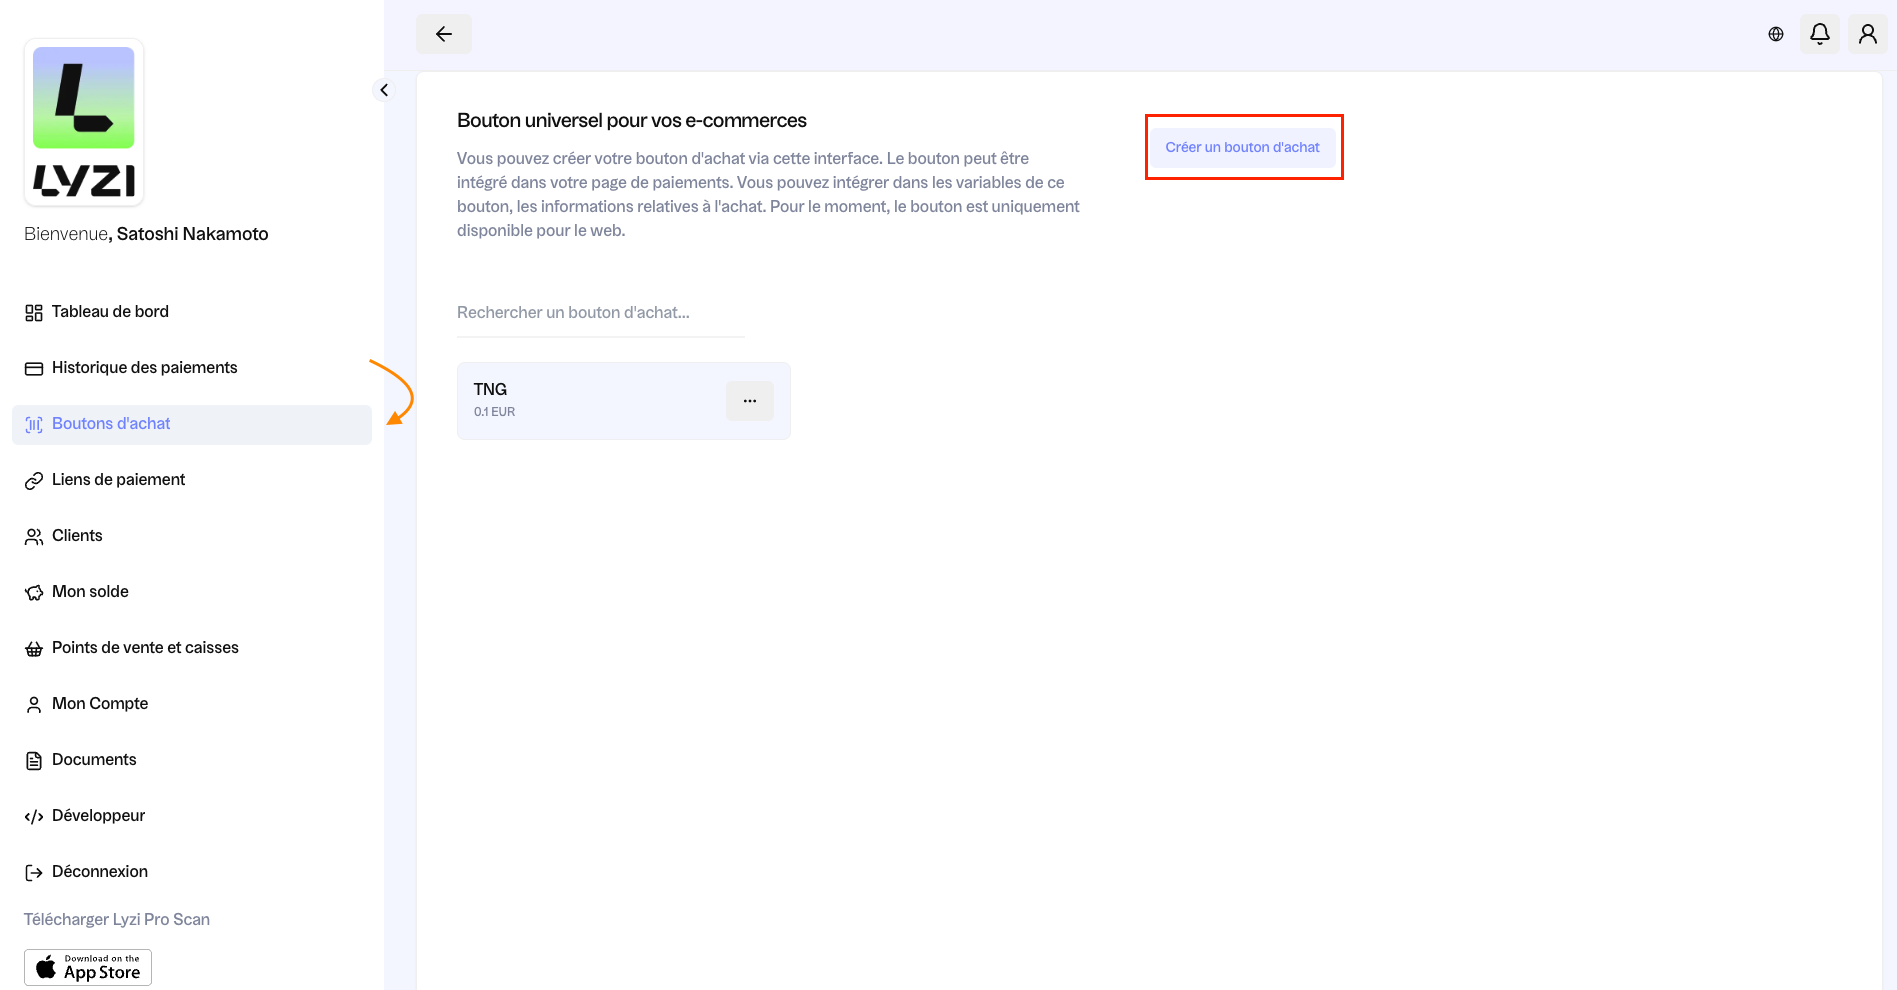
To create a buy button, click "Create a buy button" (see red box).
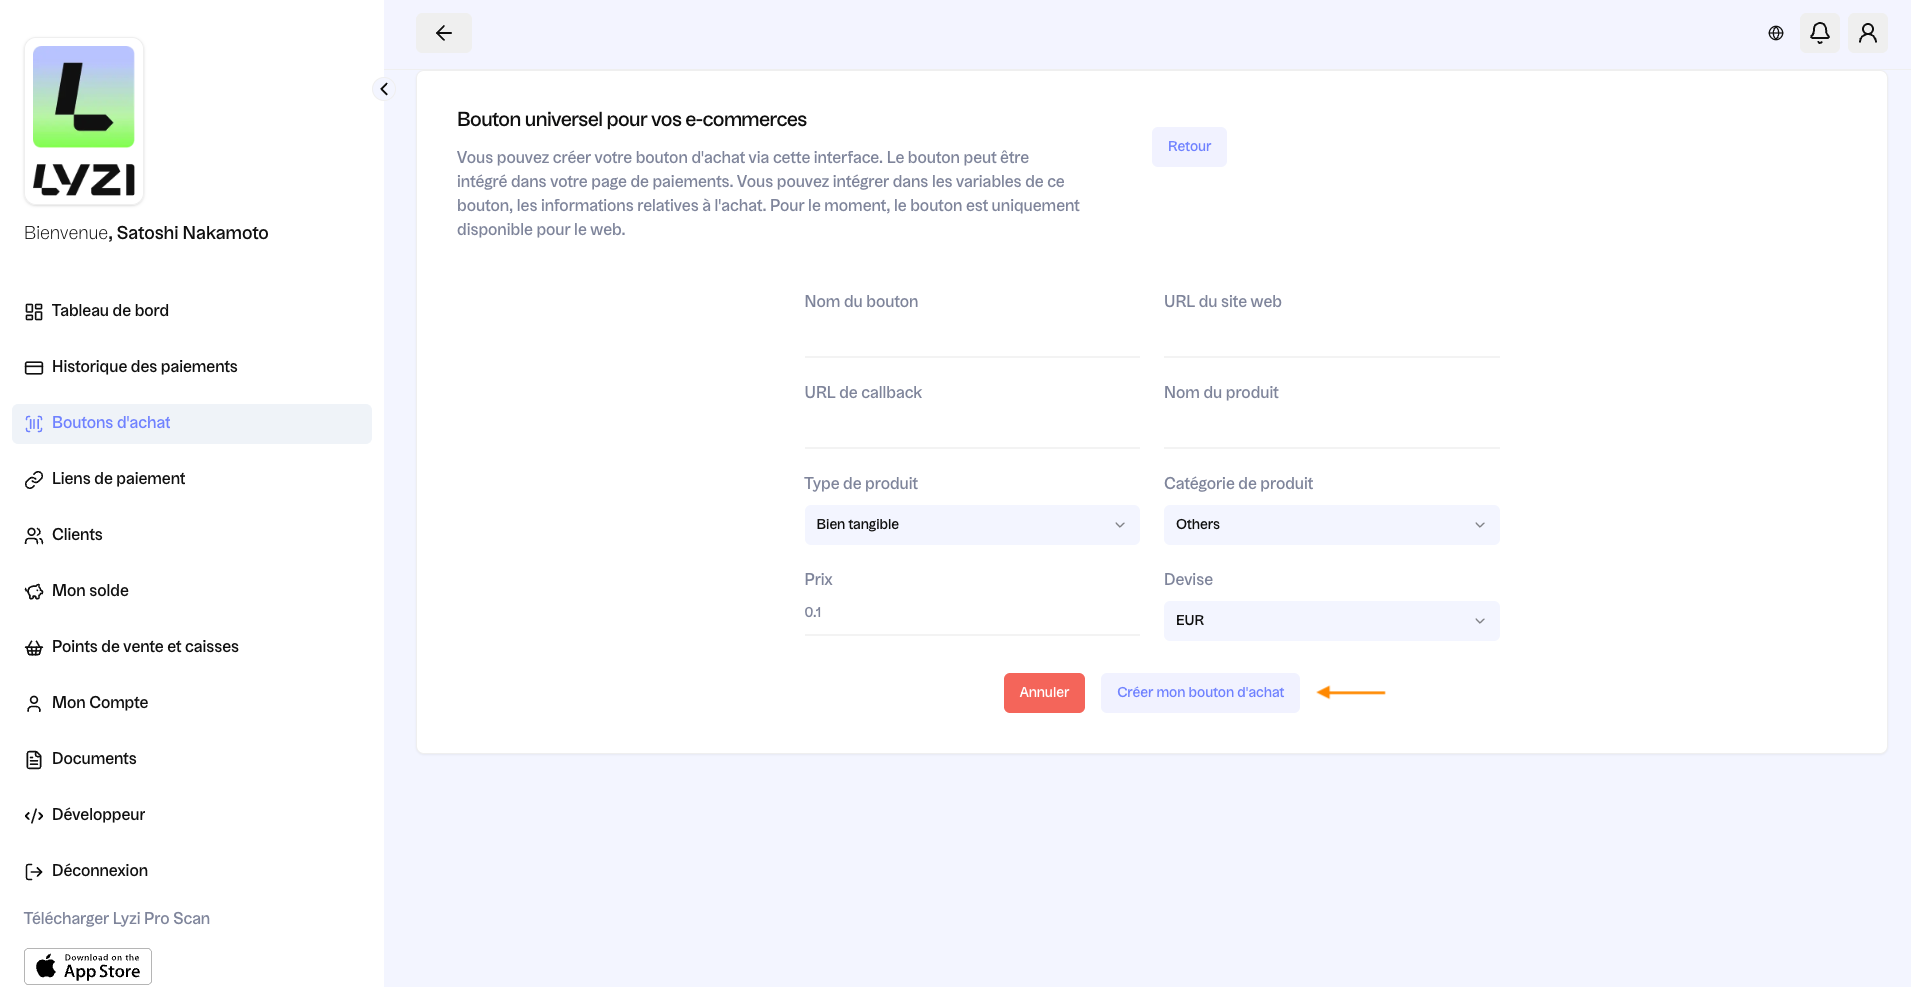
Then, you access the configuration interface for your buy button.\
You must fill in:
* The buy button name
* Your website URL
* Callback/webhook URL
* Product name
* Product type (tangible or virtual),
* Product category (for example Electronics & Computers in this example. To display the list of categories, click on the arrow then scroll through the menu).
Finish by indicating the product price and associated currency (EUR, USD, CHF or GBP).\
Finally, when the "Create my buy button" button appears in blue (see orange arrow), you can click on it.
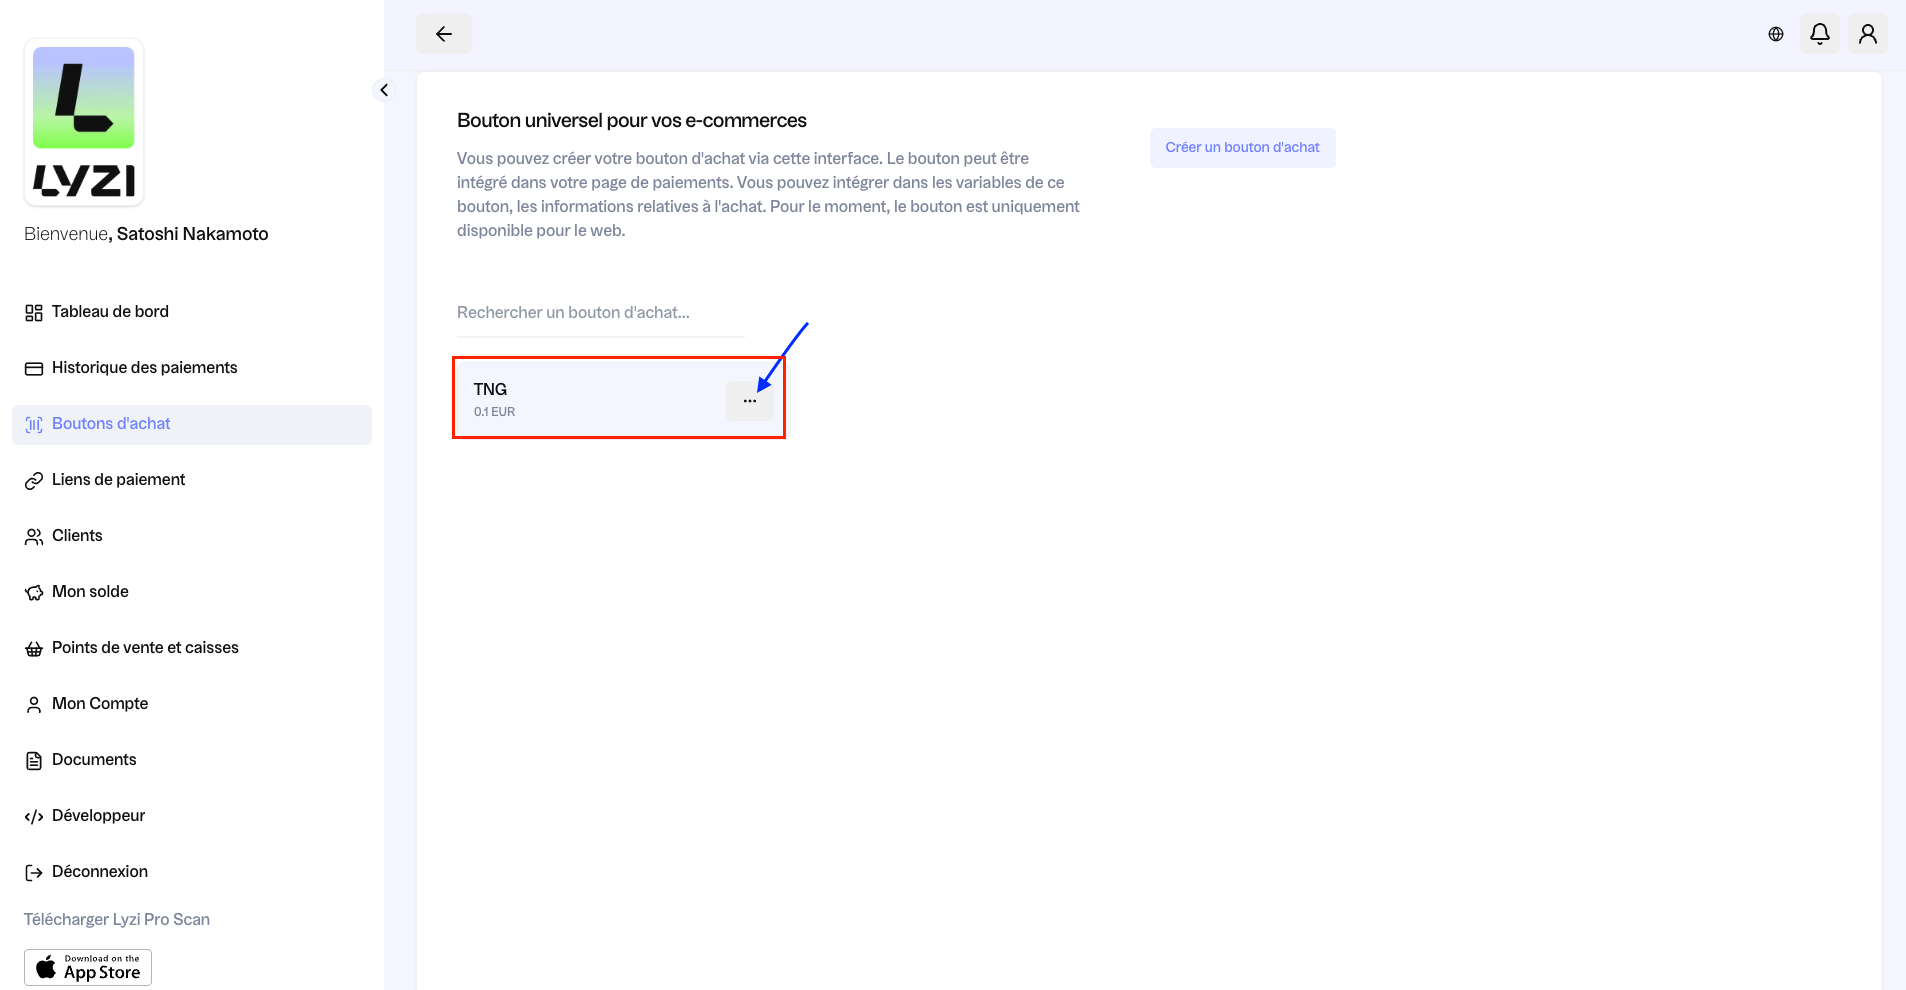
Once your buy button is created, it appears in your back office (see red box). Then, following the blue arrow and clicking on the three small dots nearby, you can view the parameters of your previously configured button.
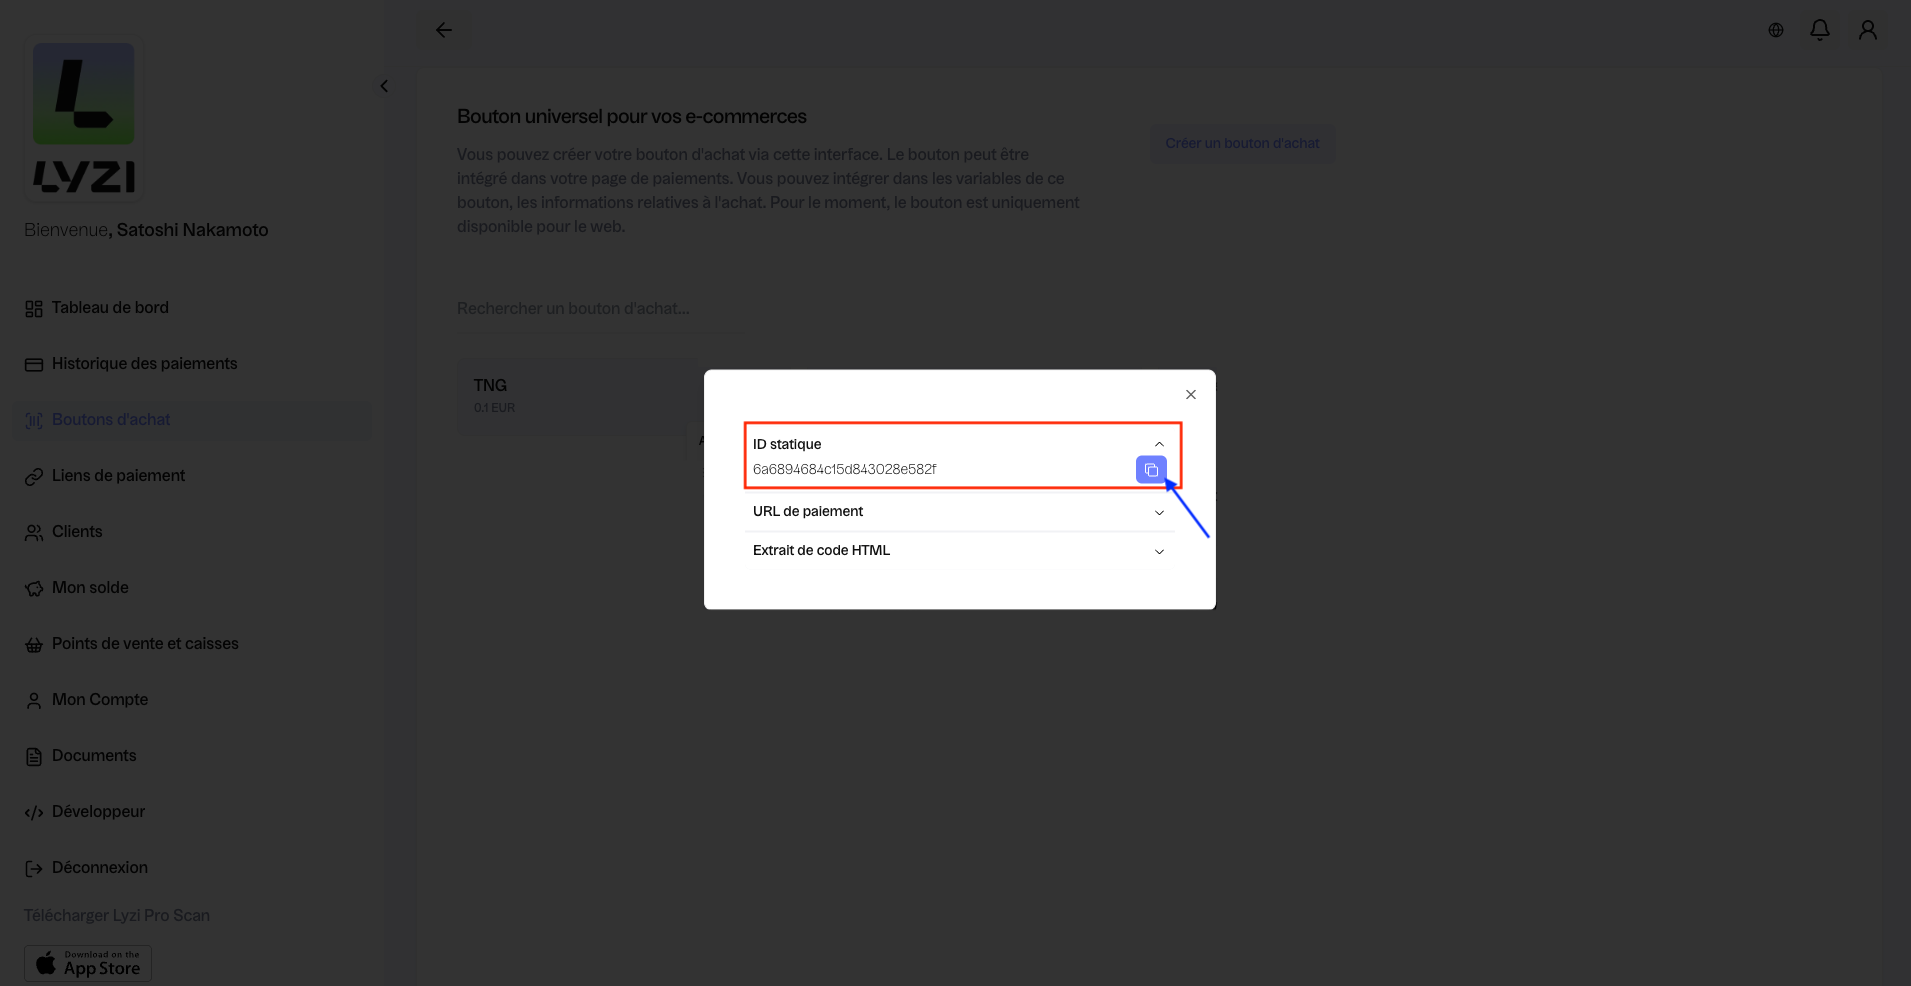
Then, the static ID (see red box), payment URL, then HTML code snippet will appear respectively. The blue square (see blue arrow) allows you to copy-paste the element. The two other elements below can also be copied-pasted.
## **Payment Links**
[Payment Links](/en/merchant/liens-de-paiement.md)
## **Customers**
[KYC Links](/en/merchant/liens-kyc.md)
## **My Balance**
[My Balance and Transfers](/en/merchant/mon-solde-et-virements.md)
## **Point of Sale and Cash Registers**
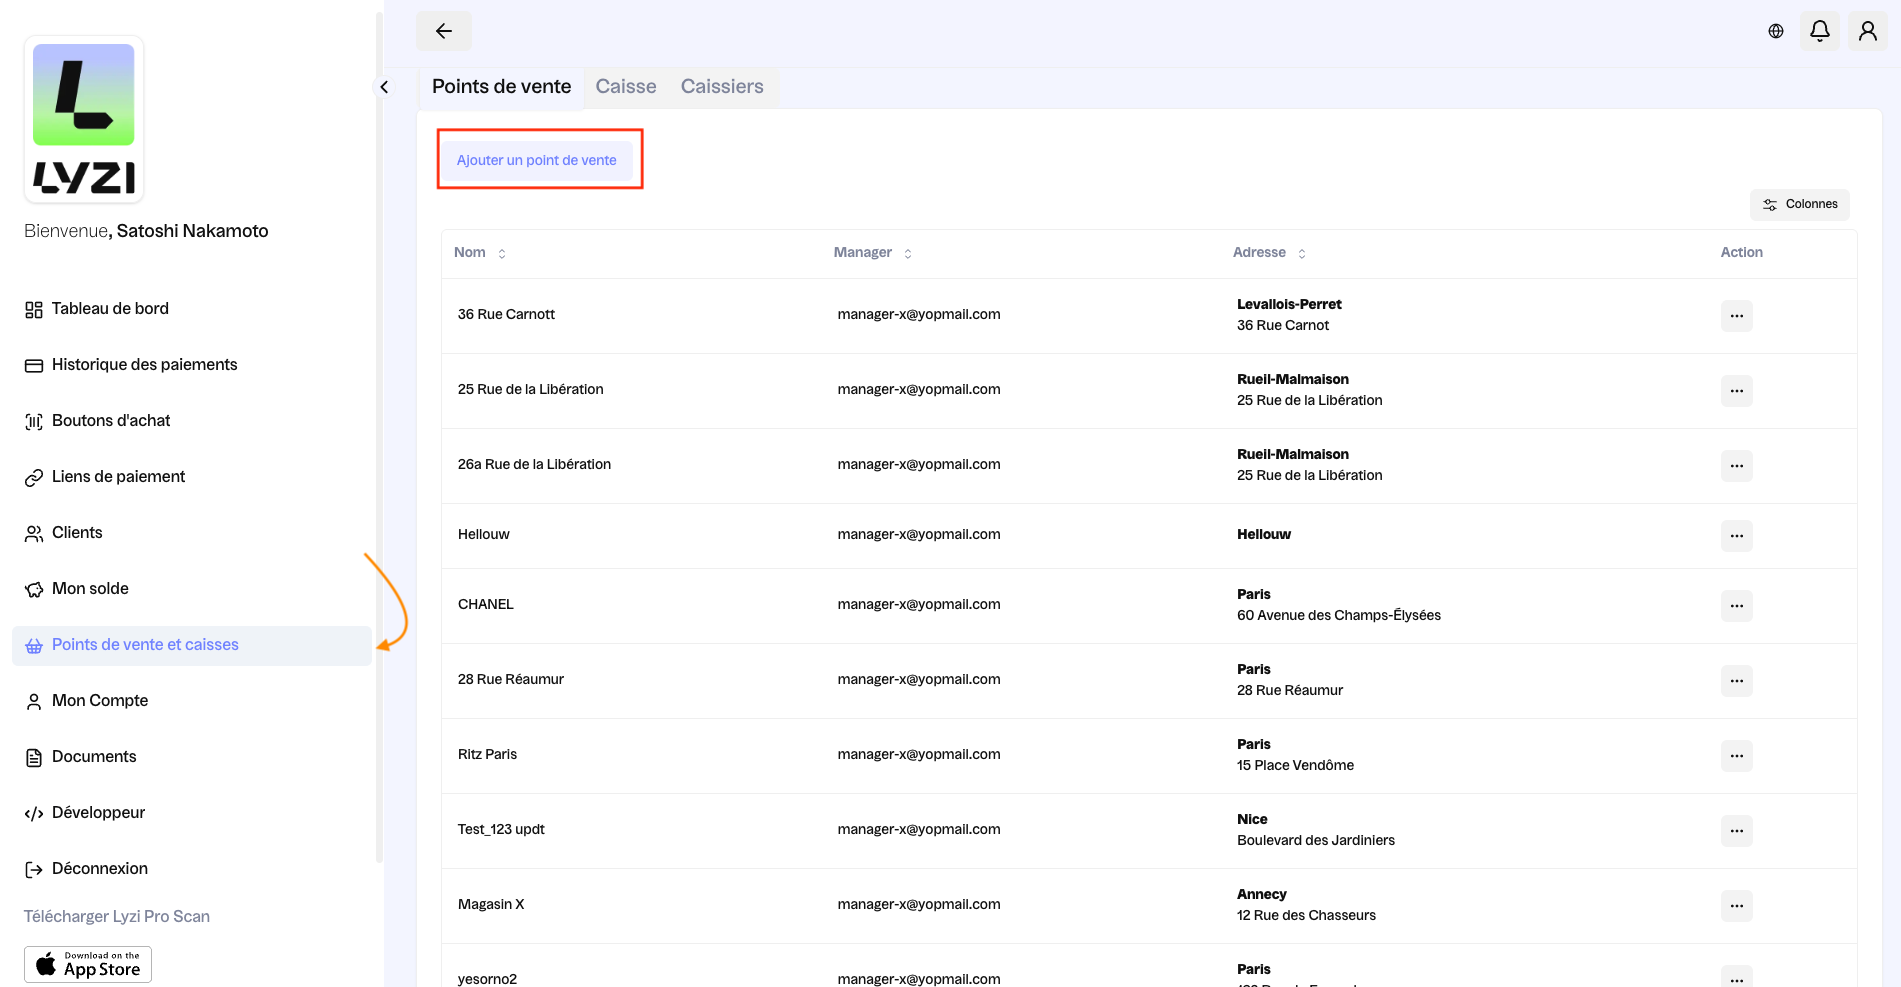
How to create and manage your point(s) of sale? To add your point of sale, go to the Points of Sale and Cash Registers page, then click "Add a point of sale" (see red box).
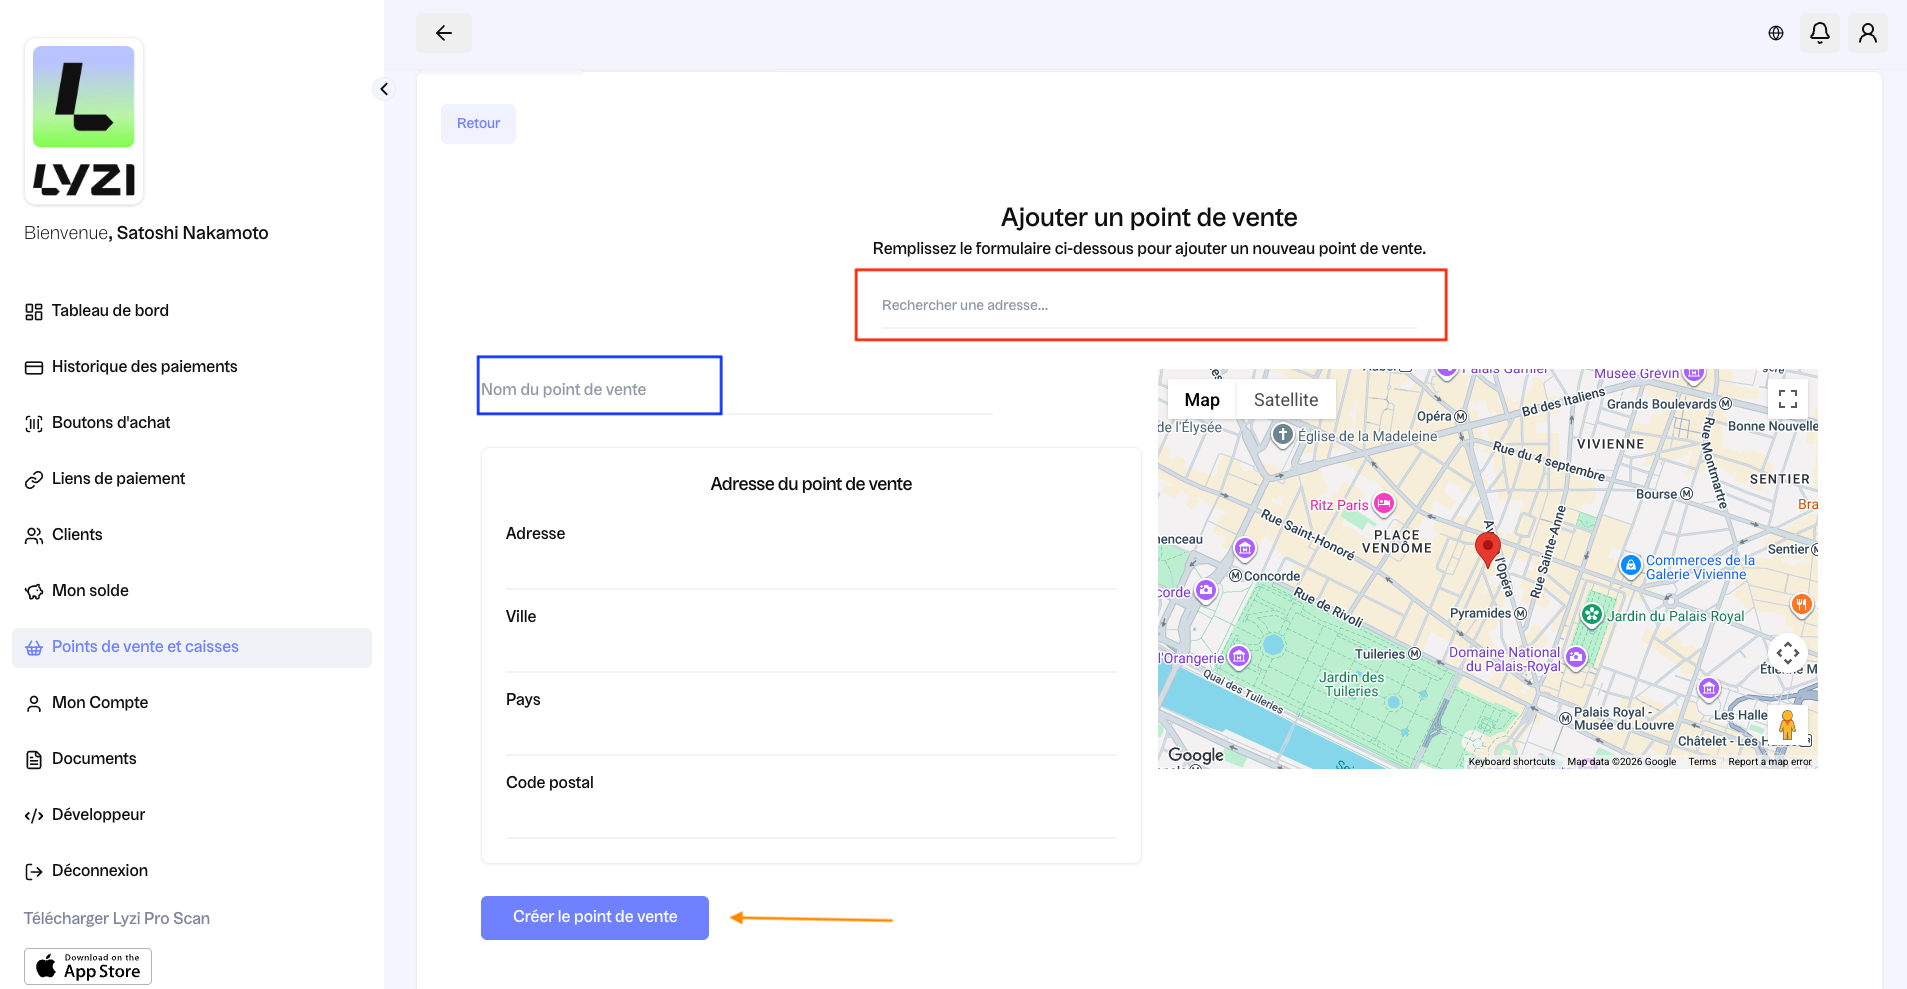
After clicking "Add a point of sale", you are redirected to a new page (see image below). Then, you need to search for your address to generate it automatically (see red box). You also have the option to manually register your point of sale by filling in the address, city, country and postal code.
Don't forget to name your point of sale (see blue box).
Finally, your point of sale will be locatable on the map. When you're done, click "Create point of sale" at the bottom left to save your point of sale (see orange arrow).
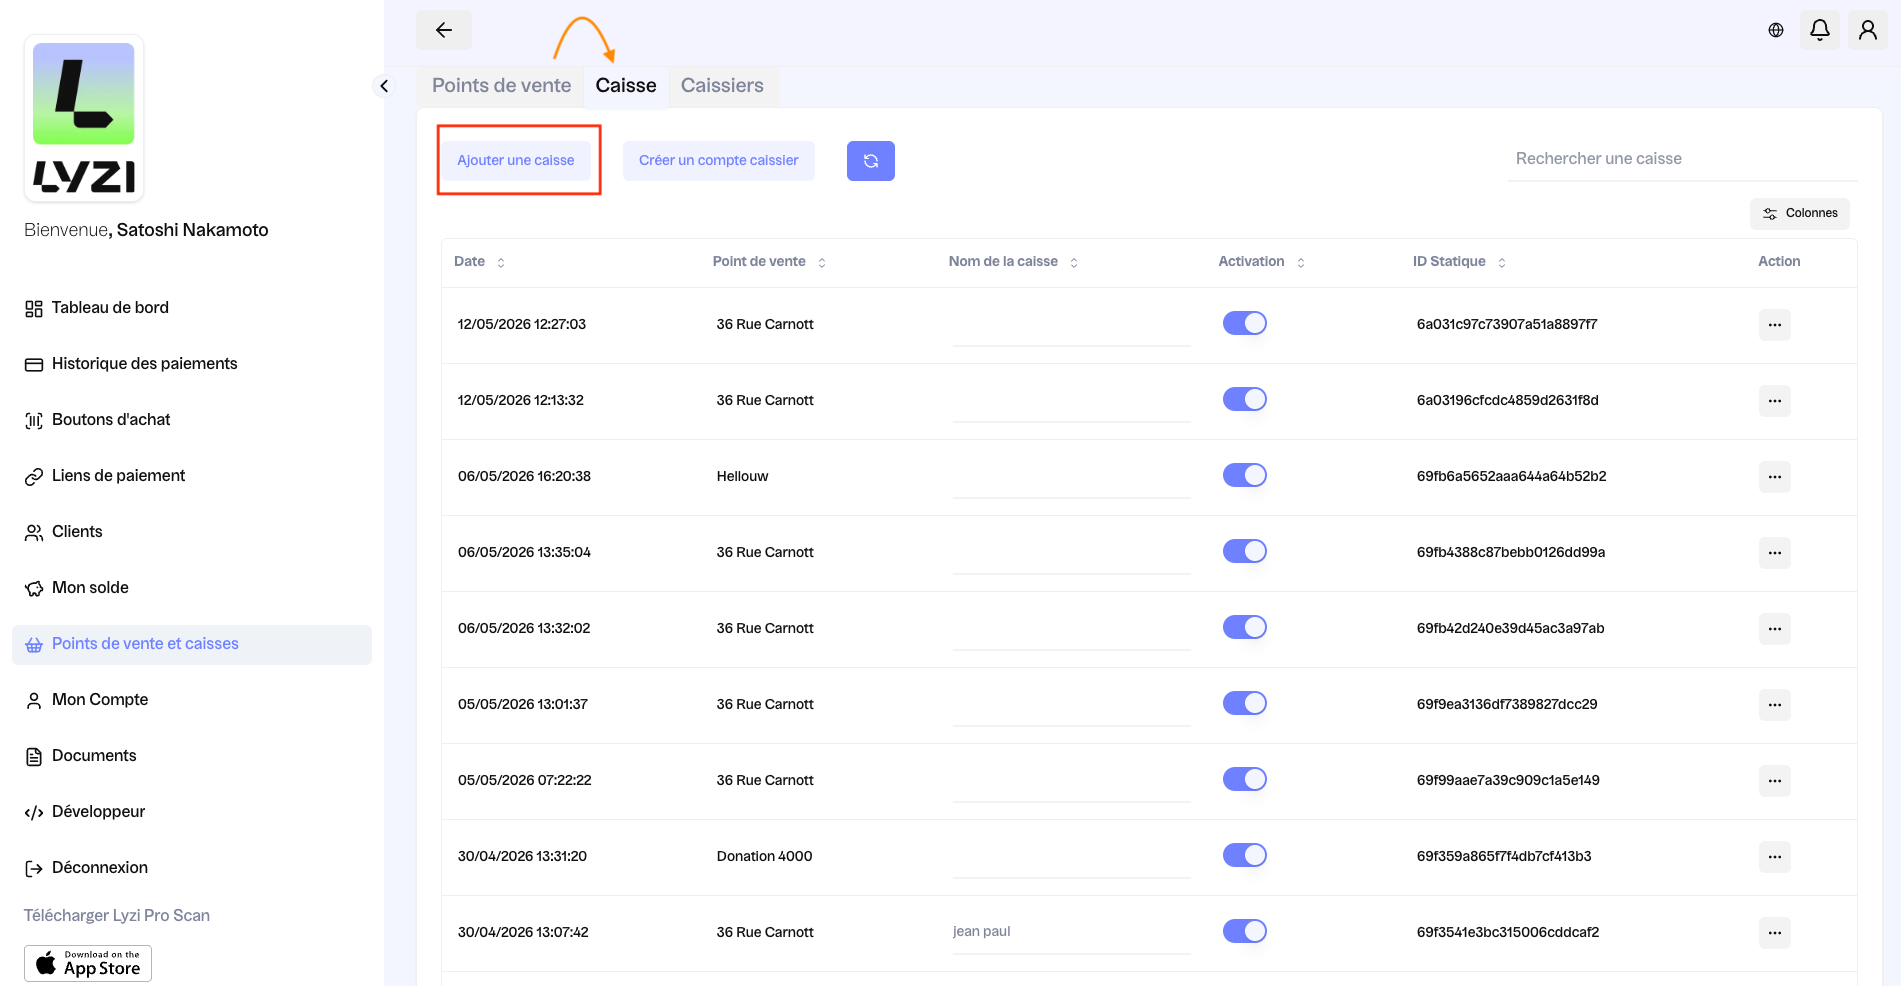
Once the point of sale is created, you need to add a cash register (see red box). To add a cash register, click "Add a cash register".
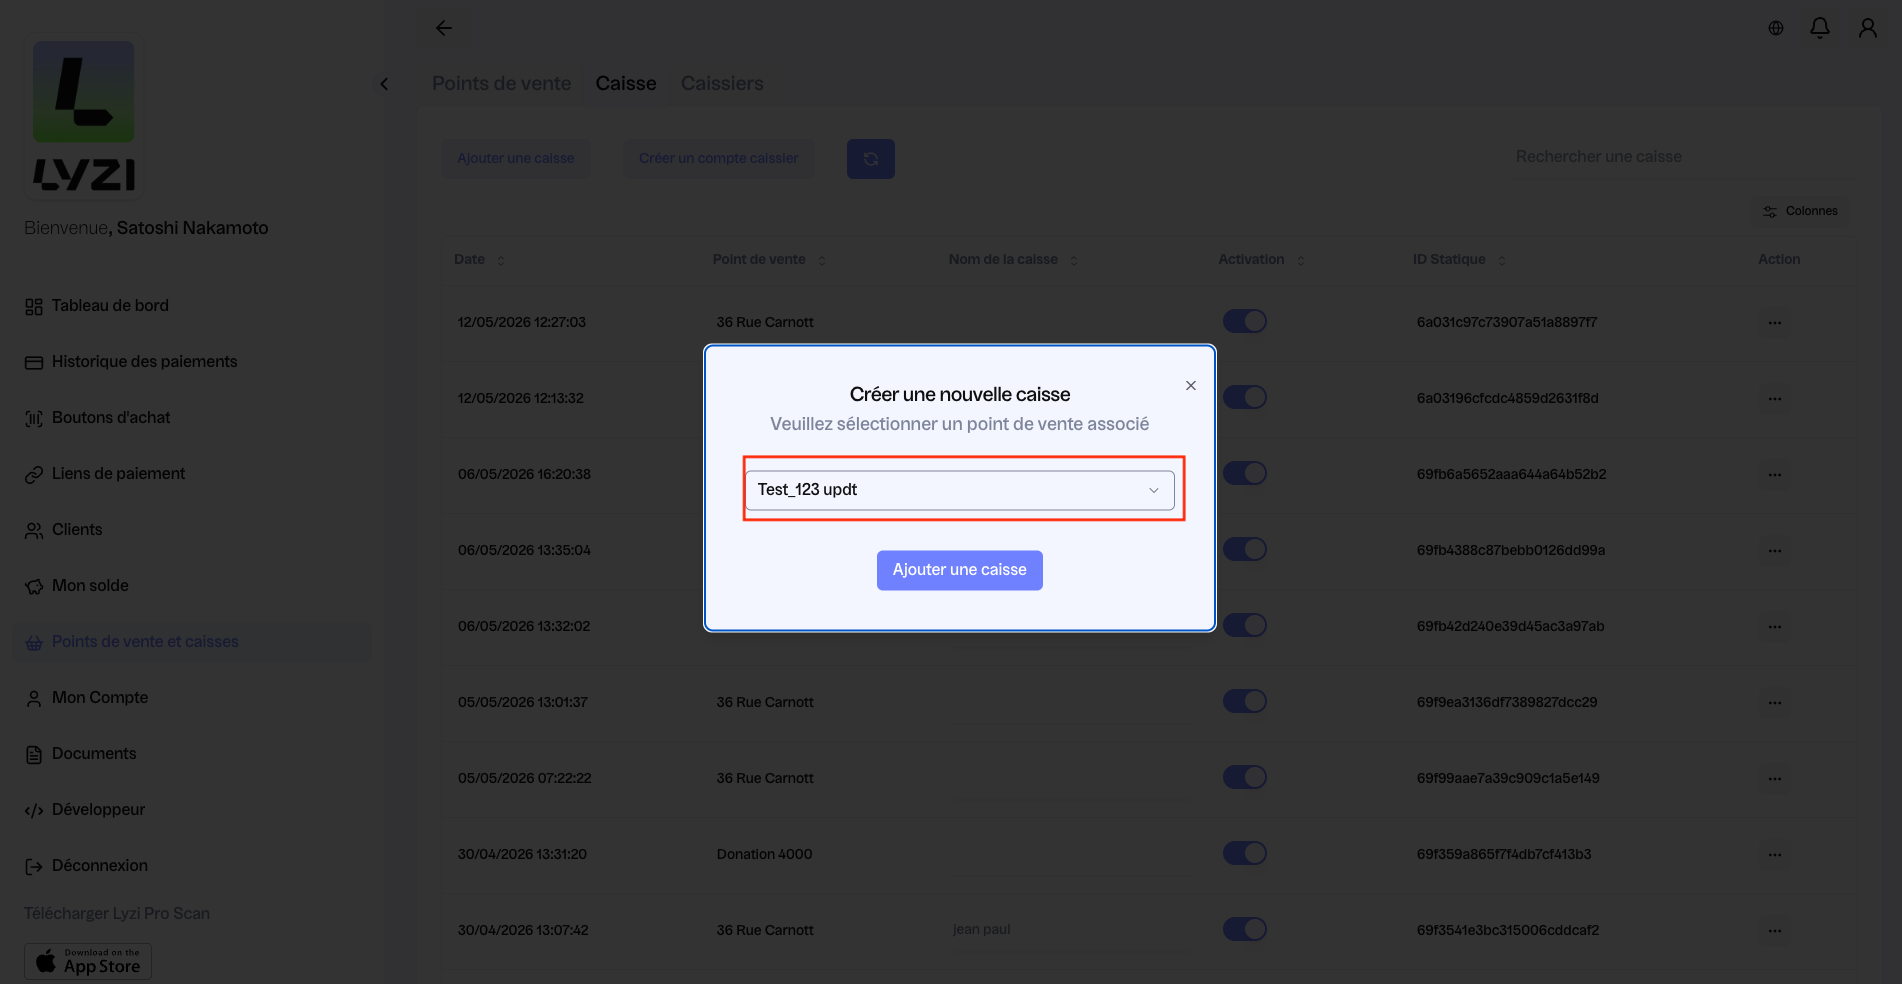
After you arrive on this page, please select the point of sale. It is essential to assign the cash register to the point of sale, otherwise you won't be able to collect in crypto. Click just below "Add a cash register" to permanently create your cash register associated with your point of sale.
When your cash register is created, it appears here (see red box). Attention, the cash register is not yet activated.
To activate a cash register, click the button on the far right (see red circle). You can see three options related to cash register activation.
### **Synchronize with Lyzi ProScan App**
By clicking on this option, a QR code appears. To activate the cash register, please scan this QR code with the Lyzi ProScan app downloaded beforehand on your smartphone, tablet (most effective for launch) or on your Android POS terminals or via Nepting. Don't forget to display the dropdown menu indicated by "For which employee" to connect the cash register to your business.
Once scanned, you have the option to enter an amount. This means it's operational. You can start collecting. Once the amount to pay is entered, show the QR code to the customer.
### **Assign Cashiers**
To assign cashiers, you must first create a cashier account (see red box).
After clicking "Create a cashier account", you can complete the cashier account by filling in the cashier's first name, last name and email. Once finished, click "Create".
When you click on "Cashiers" (see orange arrow), you can see the cashier account that was just created (see red box).
Once the cashier account is registered, you can assign it to your cash register.
To assign the cash register (once the cashier account(s) is/are created), you can select the specific cashier whose account was just created (see red box).
Then, after selecting the cashier account to assign, you click "validate".
\
Finally, you assign the QR code to the cashier by displaying the dropdown menu indicated by "For which employee". The cashier account appears just below the manager's (see red box).
The cashier's role is to be assigned to a collector, create a payment link and allow validation of supporting documents to accept a payment. A cashier can only see transactions that the collector they are assigned to has accepted.
Only the company director can perform the following task.
Once the point of sale and at least one collector are configured, a company manager can create QR codes to synchronize the Lyzi ProScan app for soft pos use.
In the collectors page, each collector can be synchronized with the app and can be assigned to a cashier.
### **Static Collection QR Code**
When you click on this option, the static collection QR code appears. Unlike QR codes to scan with the Lyzi ProScan app, this QR code is static and it's up to the customer to scan it (see red box). Ideally you can for example print this QR code and display it near your cash register or download it as PDF or PNG (see red box).
If a customer wants to pay in crypto, show them this QR code so they can scan it with the camera app on their smartphone. It will therefore be up to the customer to enter the amount to pay. They will then need to present you with the QR code that appears on their screen (after manually entering the amount of the item to pay themselves). You'll just need to scan their screen and follow the instructions on your cash register.
## **My Account**
It's on this page in "my profile" that you'll find information related to your company (see red box). You can also update some of your personal and professional information, remembering to click "update" once the information has been modified.
### KYB
In the **Legal Info** tab, you’ll find your company documents. They are viewable, downloadable and editable.
### Customization
In “Payment Module”, you can customize the payment portal used by the payer to complete a transaction.
#### Notifications
In the same tab, you can choose to enable or disable payment notifications and customize the email address used to receive them.
Cashiers
For accounts with the Cashier role, the notification settings section is located on the "My Account" page, under the "Notifications" tab.
#### Refunds
In the same screen as above, you can also select the refund options.
A transaction can easily be **cancelled** within 5 minutes of the transaction.
The **refund** can be processed by the merchant or by a cashier up to 15 days after the transaction.
#### Security
Here, in "Security", you can configure your access with the Authenticator app (to download on Android and IOS). Then, click on "Connect" to display the QR code to scan with your Authenticator app. The app automatically generates a 6-digit code that constantly updates.
## **Documents**
As indicated, these documents are kept as part of our record-keeping process.
## **Developer**
On this page, you will have access to our API and Plugin developments, ideal for e-commerce integration.
---
# Agent Instructions
This documentation is published with GitBook. GitBook is the documentation platform designed so that both humans and AI agents can read, navigate, and reason over technical content effectively. Learn more at gitbook.com.
## Querying This Documentation
If you need additional information that is not directly available in this page, you can query the documentation dynamically by asking a question.
Perform an HTTP GET request on the current page URL with the `ask` query parameter, and the optional `goal` query parameter:
```
GET https://docs.lyzi.io/en/merchant/backoffice.md?ask=&goal=
```
`ask` is the immediate question: it should be specific, self-contained, and written in natural language.
`goal` is optional and describes the broader end goal you are ultimately trying to accomplish on behalf of the user. GitBook uses it to tailor the answer towards what is most useful for that goal.
The response will contain a direct answer to the question and relevant excerpts and sources from the documentation.
Use this mechanism when the answer is not explicitly present in the current page, you need clarification or additional context, or you want to retrieve related documentation sections.


.png?alt=media)
.png?alt=media)
.png?alt=media)
.png?alt=media)
.png?alt=media)
