> For the complete documentation index, see [llms.txt](https://docs.lyzi.io/llms.txt). Markdown versions of documentation pages are available by appending `.md` to page URLs; this page is available as [Markdown](https://docs.lyzi.io/en/merchant/onboarding.md).

# Onboarding

Onboarding is a necessary step to register, configure your account and then start collecting cryptocurrency with Lyzi.

To start creating an account, make sure you have all the documents mentioned below:

* **KBIS** dated **LESS THAN 3 MONTHS**
* **IBAN** for euro reversal
* **Email** (which will be used to connect to your back office)
* A logo
* **Identity document** of the company's directors and ultimate beneficial owners
* **Register** of **Ultimate Beneficial Owners\***
* **Proof of address** of the ultimate beneficial owners
* Latest financial statements

{% hint style="info" %}
**How to access the RBE?**\
The fastest way is to go to the InfoGreffe website: <https://www.infogreffe.fr/>, then enter the company name. On the menu page, click on "Ultimate Beneficial Owners" to get the RBE.
{% endhint %}

Once these documents are obtained, you can start creating your account by following the link here: <https://admin.lyzi.io/onboarding>.

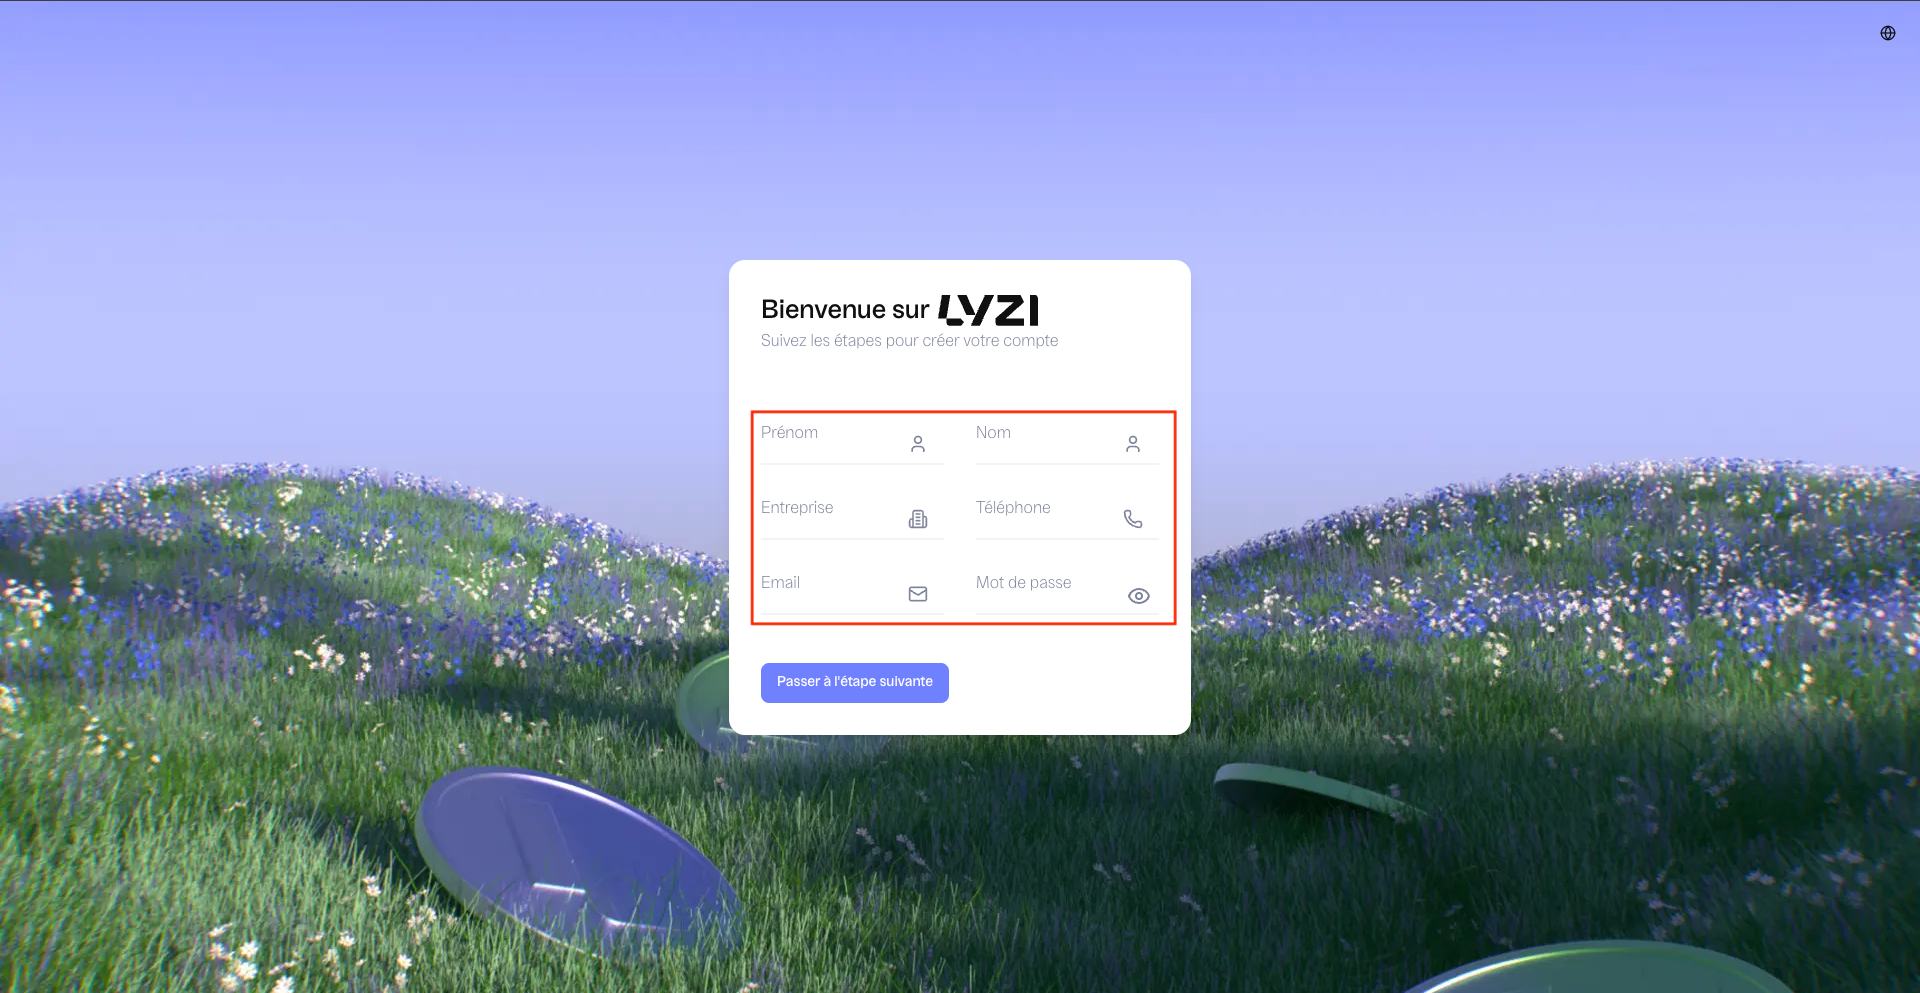
After clicking on this link, you will be redirected to this page (see image below) where you will complete your information

* First name
* Last name
* Company
* Phone
* Email
* Password (Remember to save it well!)

By clicking on the link, you will be redirected to this page. Please complete all the necessary information to proceed to the next step.

<figure><img src="https://2899979654-files.gitbook.io/~/files/v0/b/gitbook-x-prod.appspot.com/o/spaces%2FwaQosSnszpcHR9Zimu5R%2Fuploads%2Fgit-blob-abad8830b05ed90e662cccf914a16dd07a0eebff%2FCapture%20d%E2%80%99e%CC%81cran%202026-09-17%20a%CC%80%2016.57.20.png?alt=media" alt=""><figcaption></figcaption></figure>

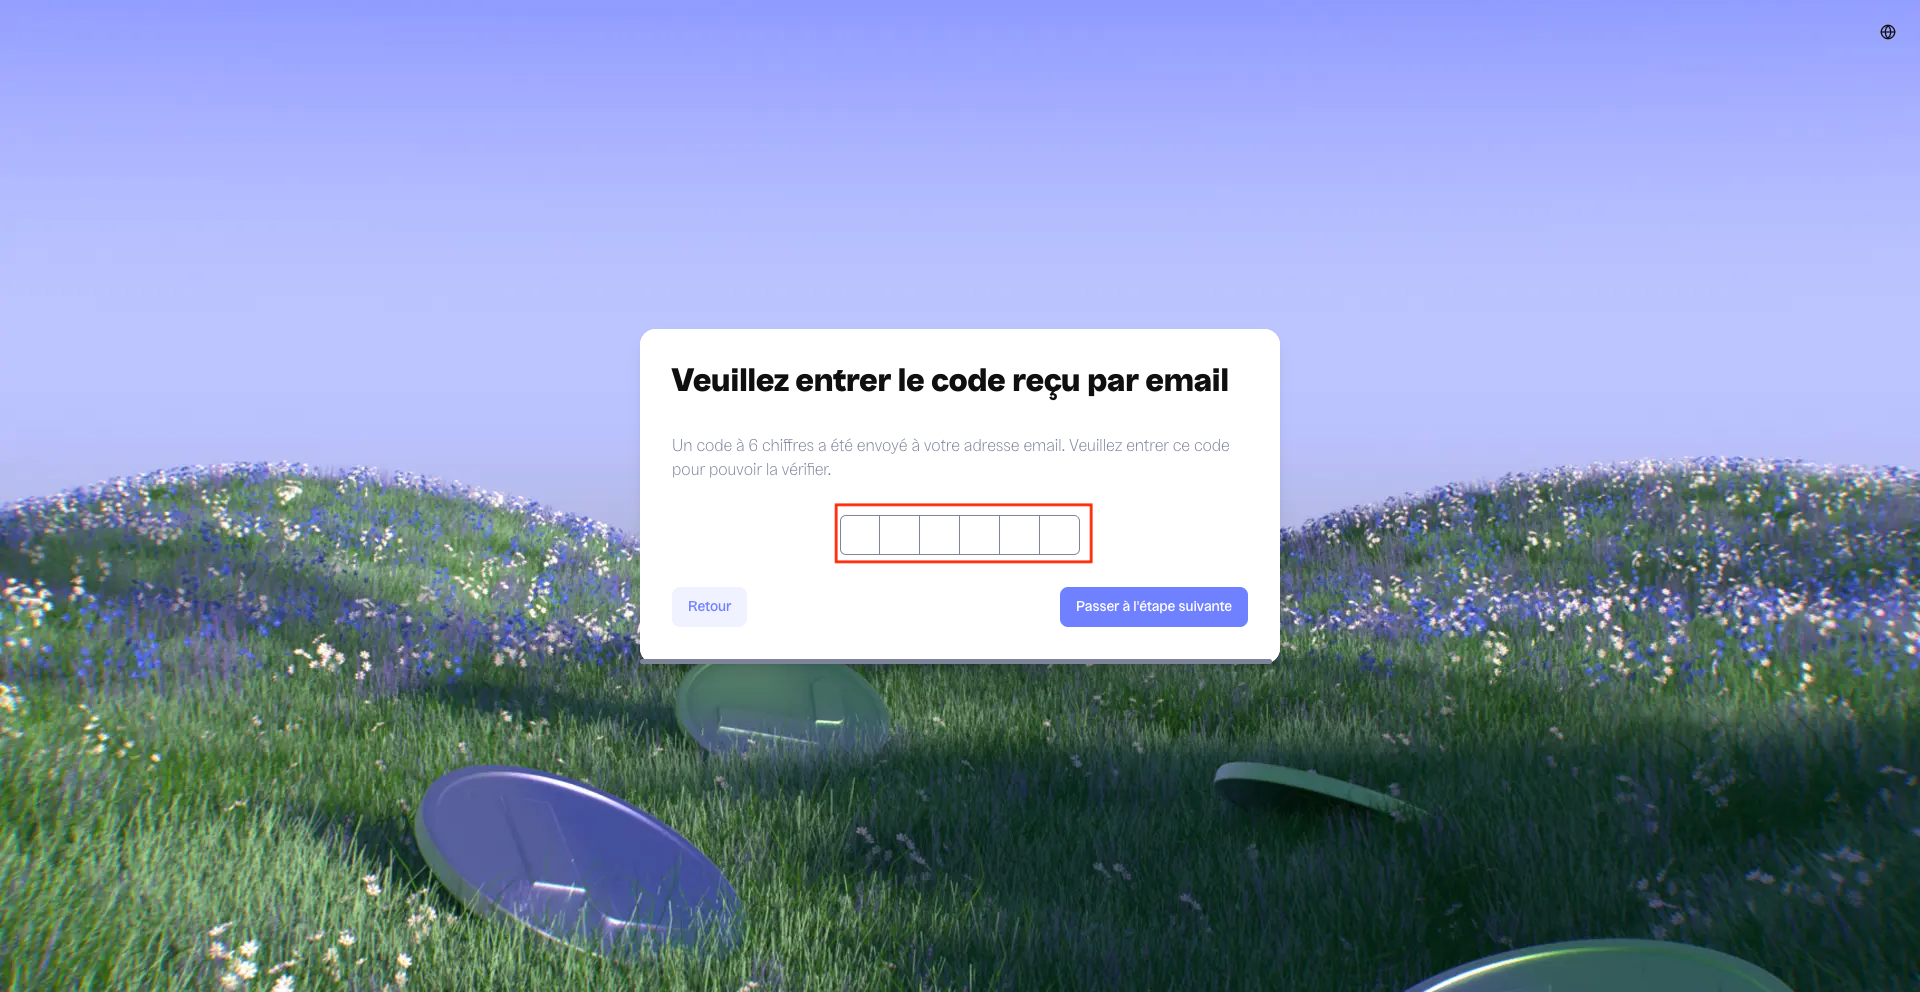
Then, you will receive a one-time use 6-digit code valid for 5 minutes on your email address (the same one entered earlier to create your account). This code must be entered in the corresponding boxes (see red box). This code is personal, avoid sharing it with others. Once the code is entered, you can proceed to the next step.

<figure><img src="https://2899979654-files.gitbook.io/~/files/v0/b/gitbook-x-prod.appspot.com/o/spaces%2FwaQosSnszpcHR9Zimu5R%2Fuploads%2Fgit-blob-2d7d4d96b850fa182e21eb391bf9dca416eaed0a%2FCapture%20d%E2%80%99e%CC%81cran%202026-09-17%20a%CC%80%2017.00.33.png?alt=media" alt=""><figcaption></figcaption></figure>

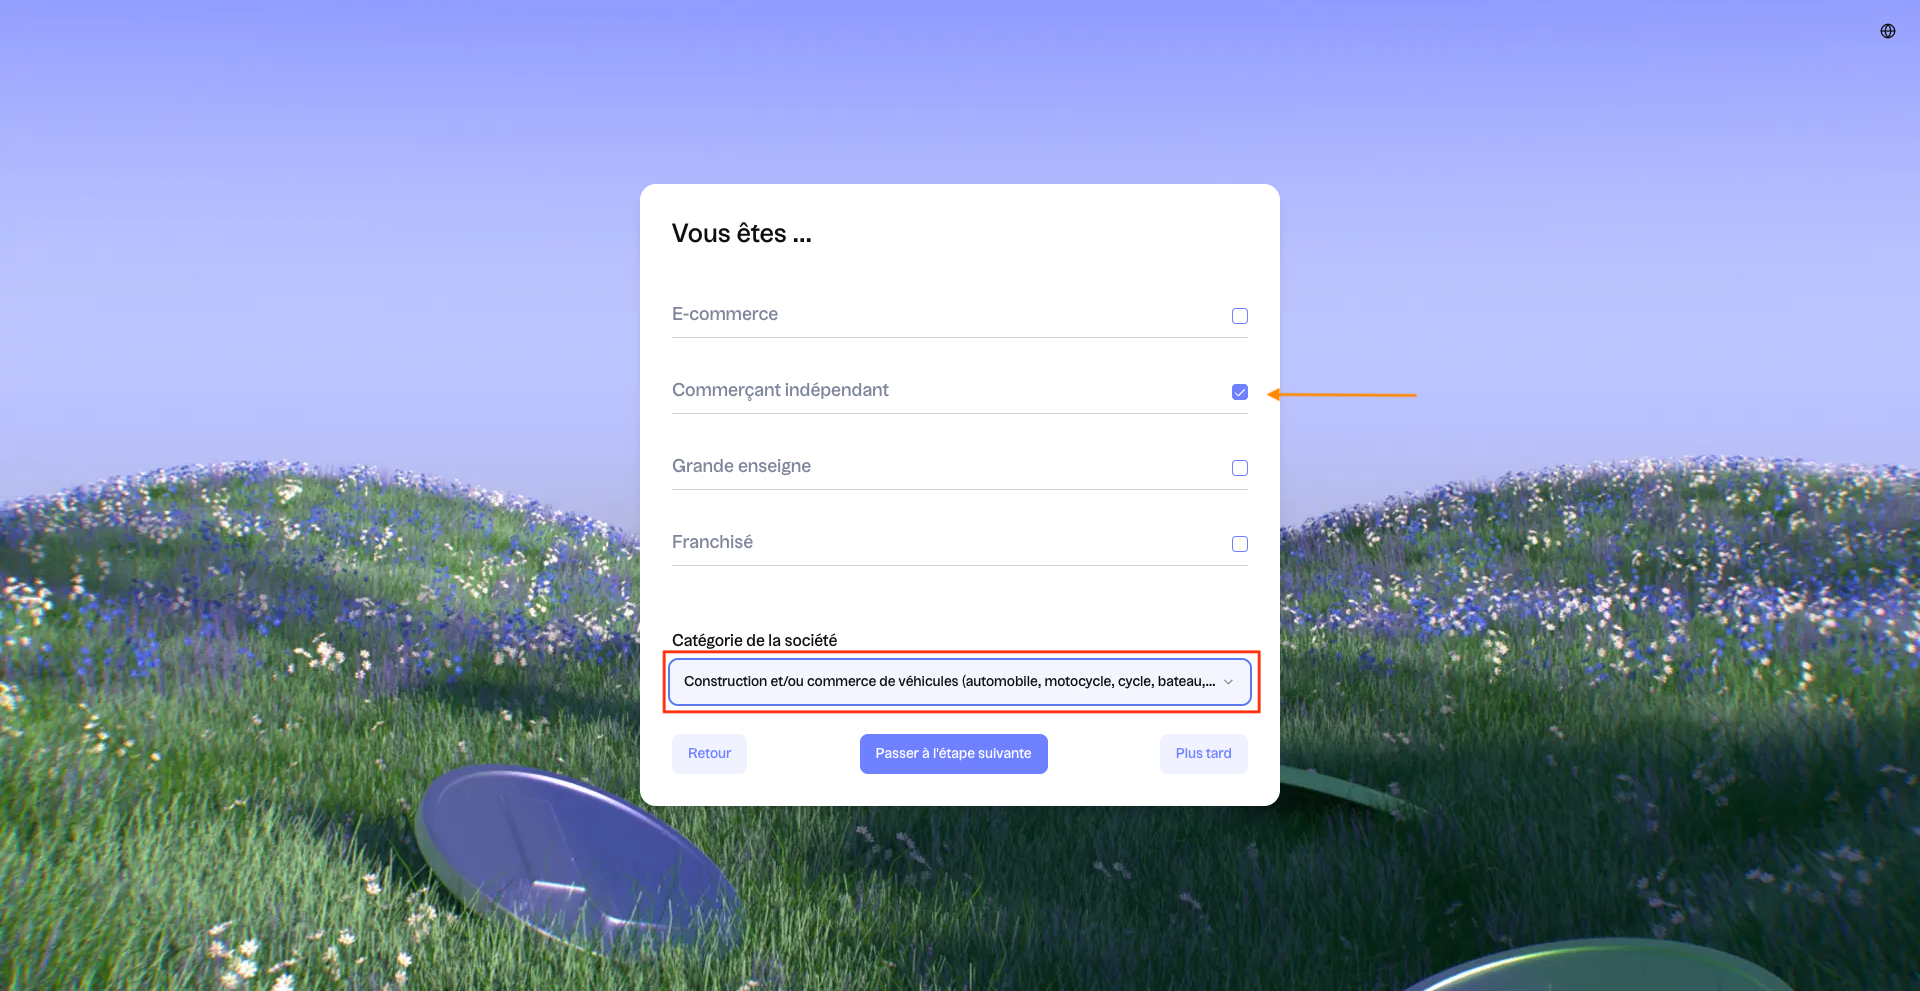
Then, please select your type of activity (e-commerce, independent merchant, large chain or franchise). Don't forget to indicate your company category (= business sector) see red box. Once this step is completed, you can proceed to the next step.

<figure><img src="https://2899979654-files.gitbook.io/~/files/v0/b/gitbook-x-prod.appspot.com/o/spaces%2FwaQosSnszpcHR9Zimu5R%2Fuploads%2Fgit-blob-32f09fb36d0d384408b6691692ca9d6c9123791c%2FCapture%20d%E2%80%99e%CC%81cran%202026-09-17%20a%CC%80%2017.03.36.png?alt=media" alt=""><figcaption></figcaption></figure>

{% embed url="<https://youtu.be/UfMghkT1zbE>" %}

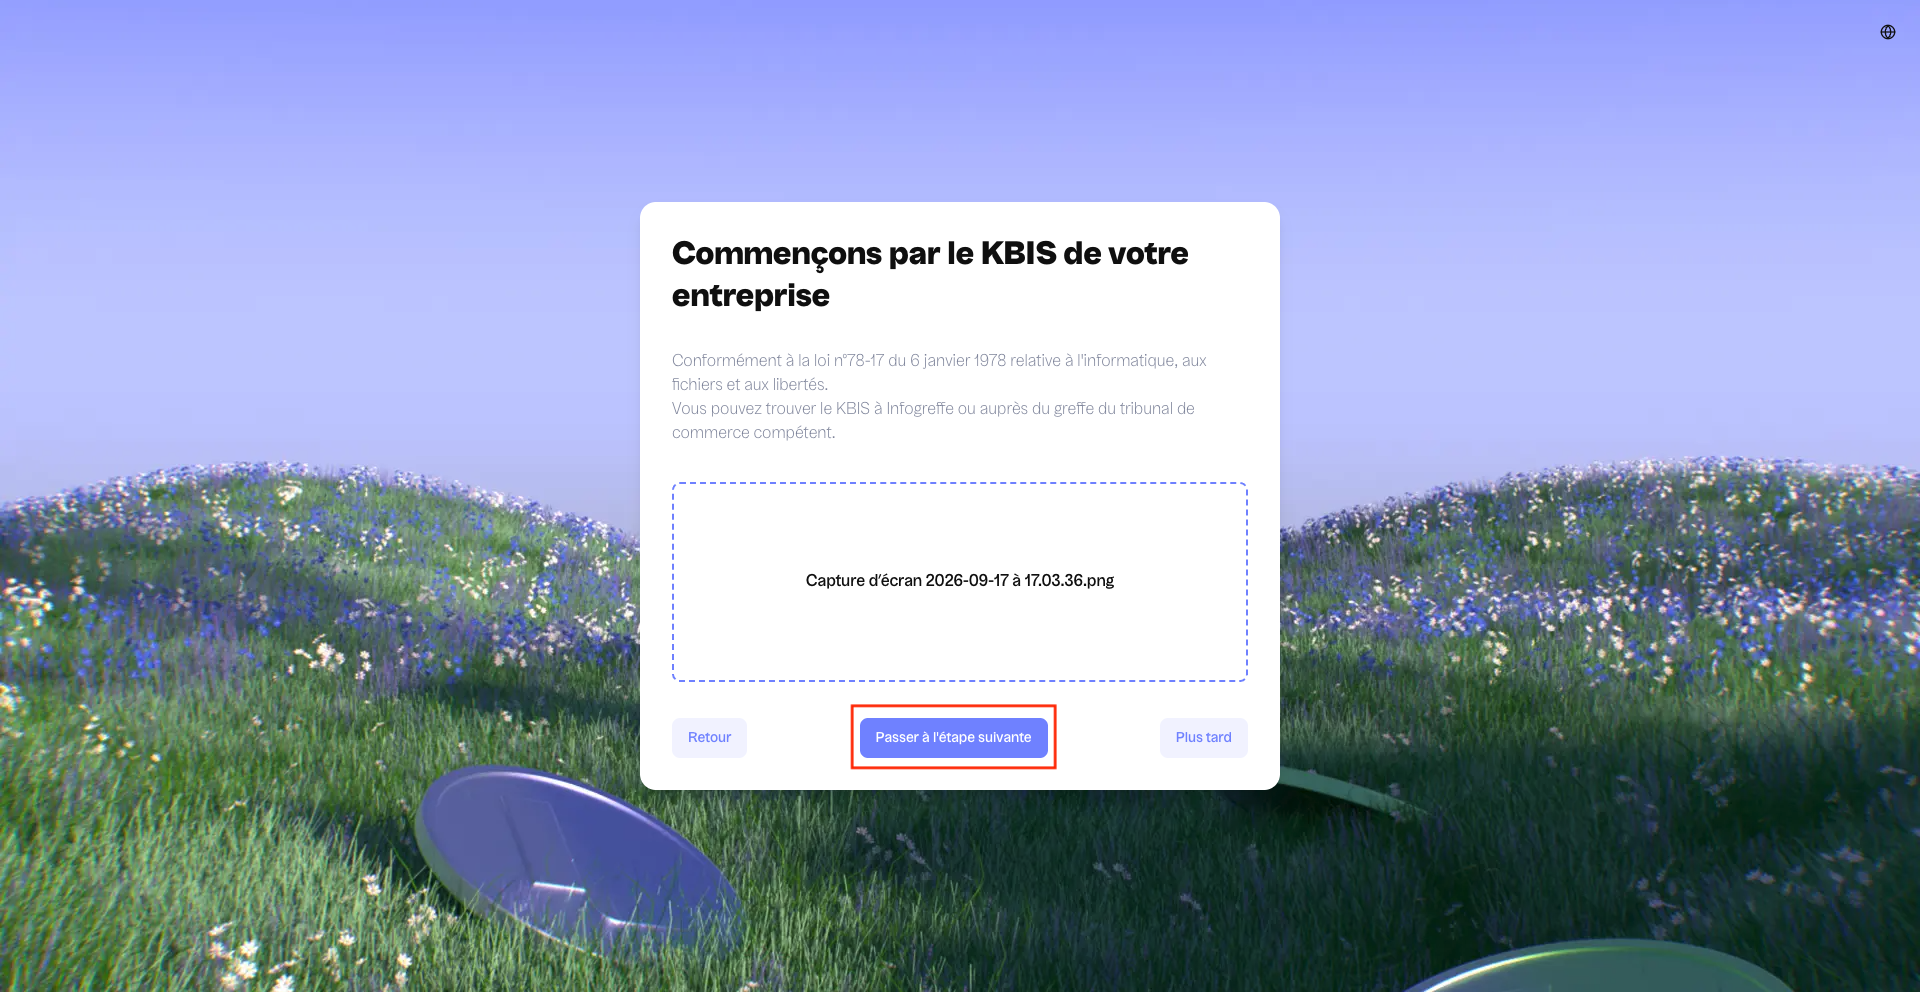
The next steps are downloading documents related to your company. The first being the KBIS, you can download it then proceed to the next step (see red box).

<figure><img src="https://2899979654-files.gitbook.io/~/files/v0/b/gitbook-x-prod.appspot.com/o/spaces%2FwaQosSnszpcHR9Zimu5R%2Fuploads%2Fgit-blob-d61d7abd43b5253996bdc01d5aaf575a762a422c%2FCapture%20d%E2%80%99e%CC%81cran%202026-09-17%20a%CC%80%2017.05.12.png?alt=media" alt=""><figcaption></figcaption></figure>

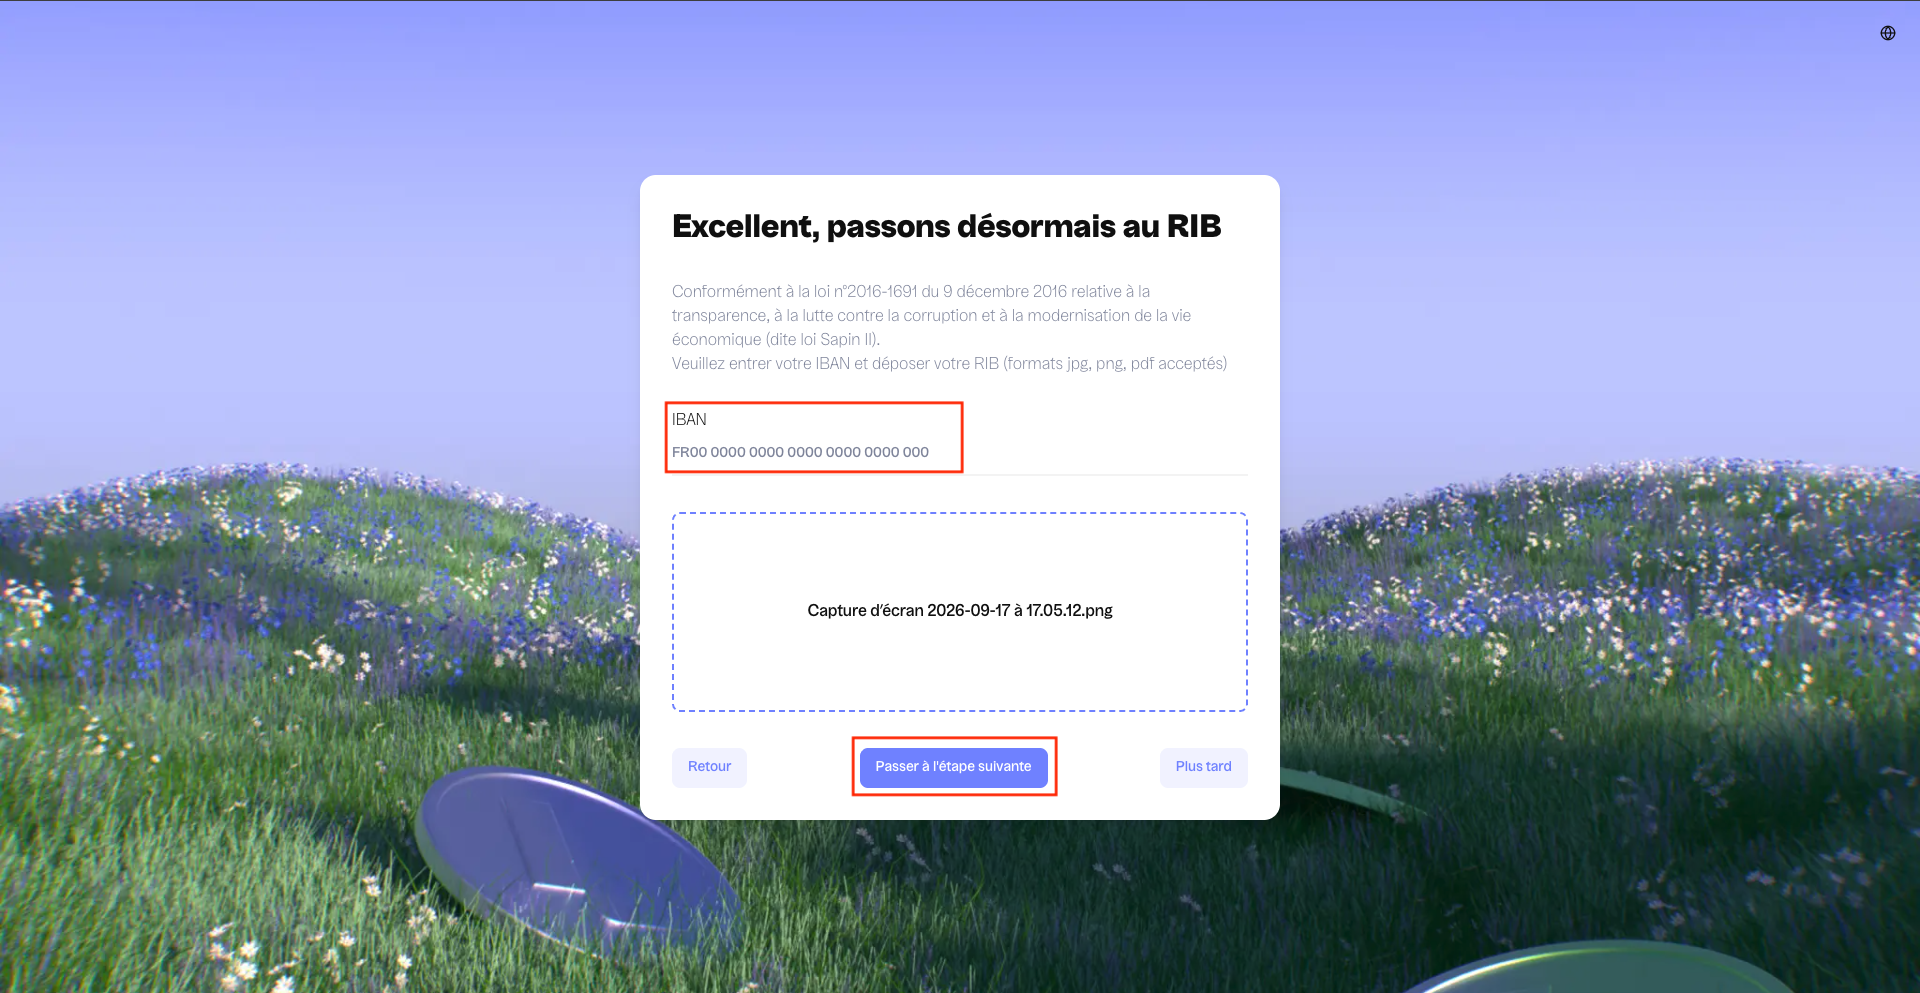
Then, you need to download your RIB to be reversed in euros to your account. In addition to downloading, don't forget to manually enter your IBAN (see red circle) then proceed to the next step.

<figure><img src="https://2899979654-files.gitbook.io/~/files/v0/b/gitbook-x-prod.appspot.com/o/spaces%2FwaQosSnszpcHR9Zimu5R%2Fuploads%2Fgit-blob-a8d53a365880f422a29095d9e230f0e8275b4676%2FCapture%20d%E2%80%99e%CC%81cran%202026-09-17%20a%CC%80%2017.07.33.png?alt=media" alt=""><figcaption></figcaption></figure>

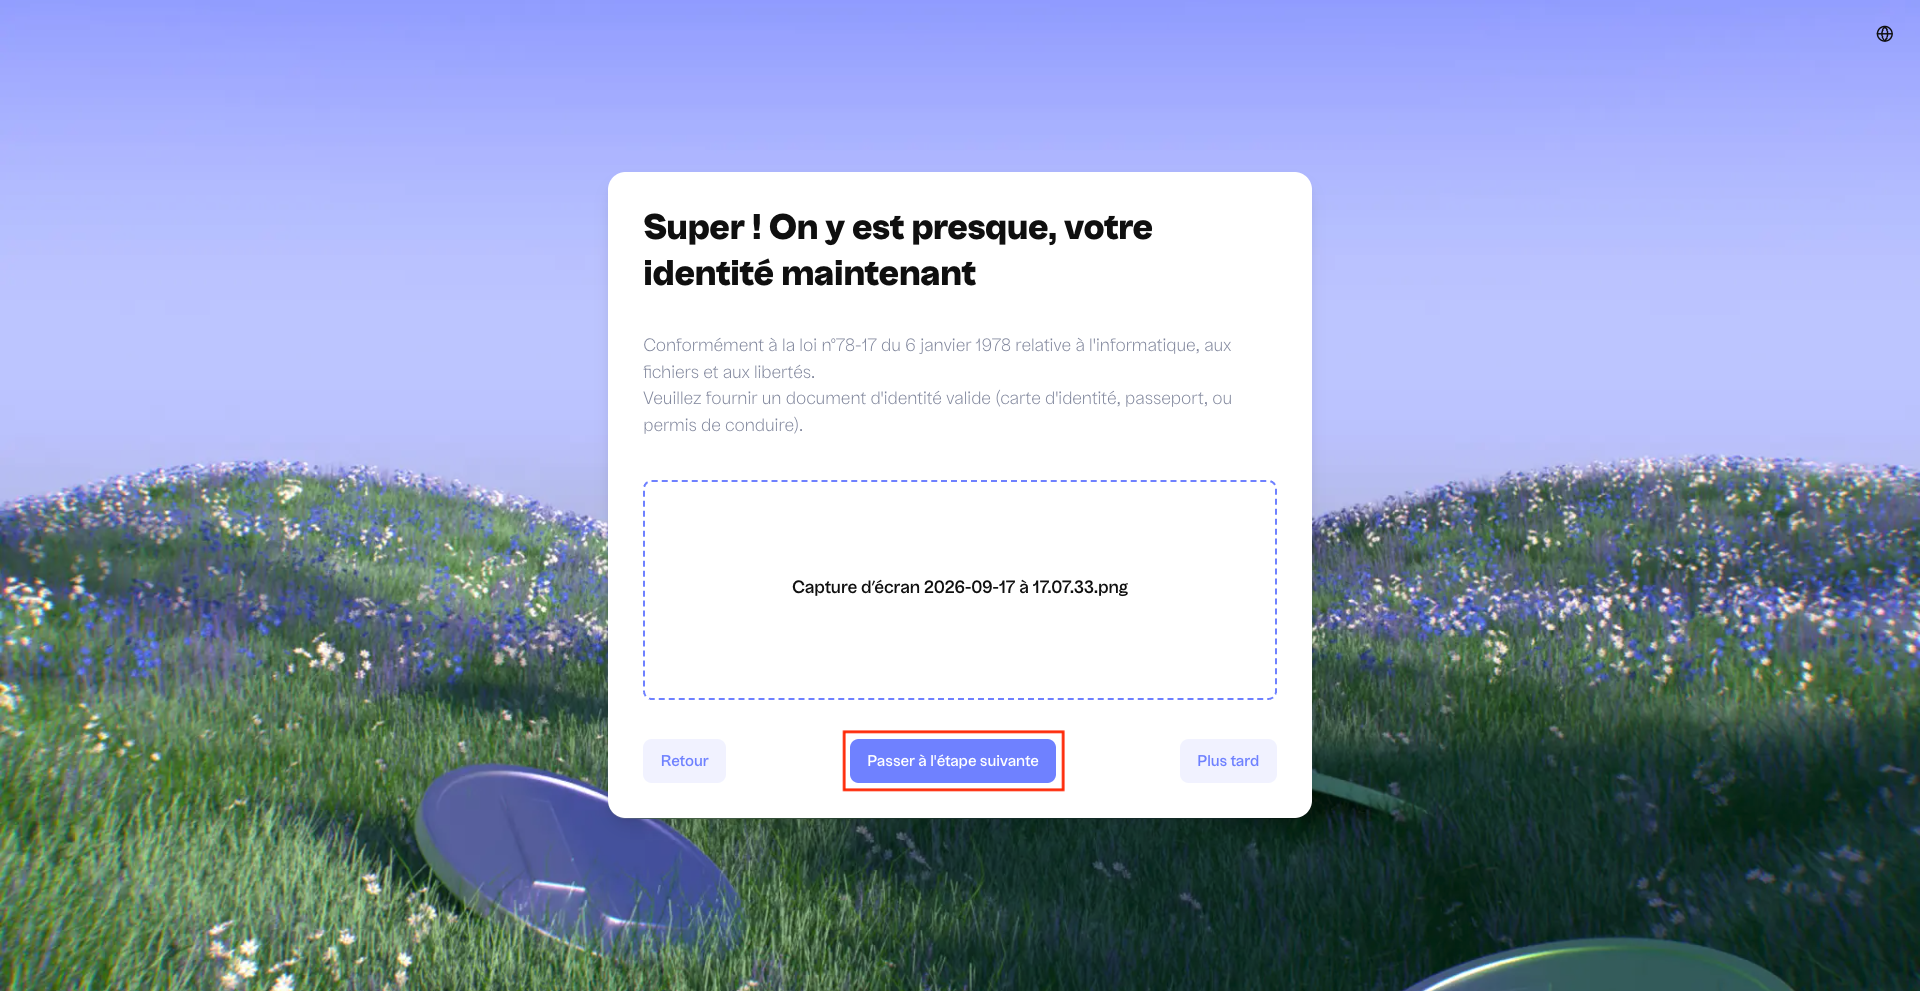
Then, you need to download your identity document or passport.

<figure><img src="https://2899979654-files.gitbook.io/~/files/v0/b/gitbook-x-prod.appspot.com/o/spaces%2FwaQosSnszpcHR9Zimu5R%2Fuploads%2Fgit-blob-e26a62574d9e4a5c5a63645c158f104f76b9059d%2FCapture%20d%E2%80%99e%CC%81cran%202026-09-17%20a%CC%80%2017.10.46.png?alt=media" alt=""><figcaption></figcaption></figure>

\
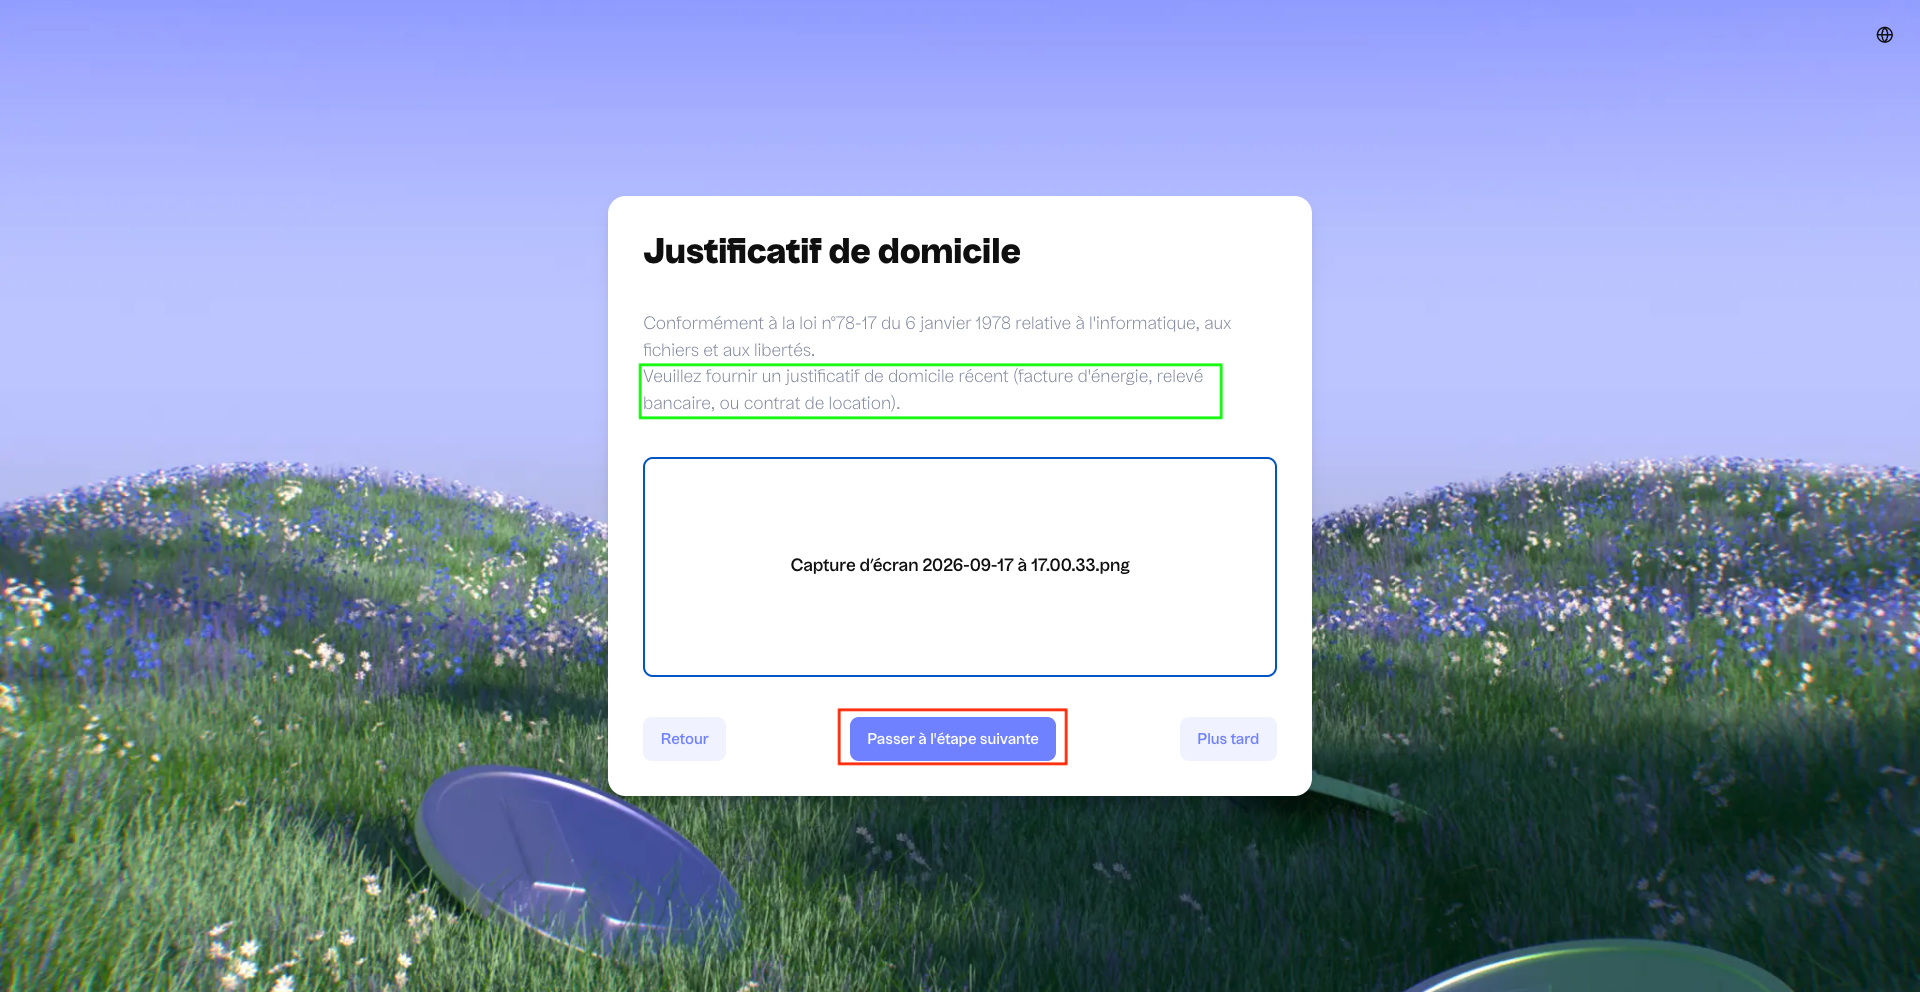
Then comes the proof of address. Only utility bills, bank statements and tax notices or official government letters are accepted (see green box).

<figure><img src="https://2899979654-files.gitbook.io/~/files/v0/b/gitbook-x-prod.appspot.com/o/spaces%2FwaQosSnszpcHR9Zimu5R%2Fuploads%2Fgit-blob-51fbebc05a85a735a163ce46f098bcbde074b781%2FCapture%20d%E2%80%99e%CC%81cran%202026-09-17%20a%CC%80%2017.11.52.png?alt=media" alt=""><figcaption></figcaption></figure>

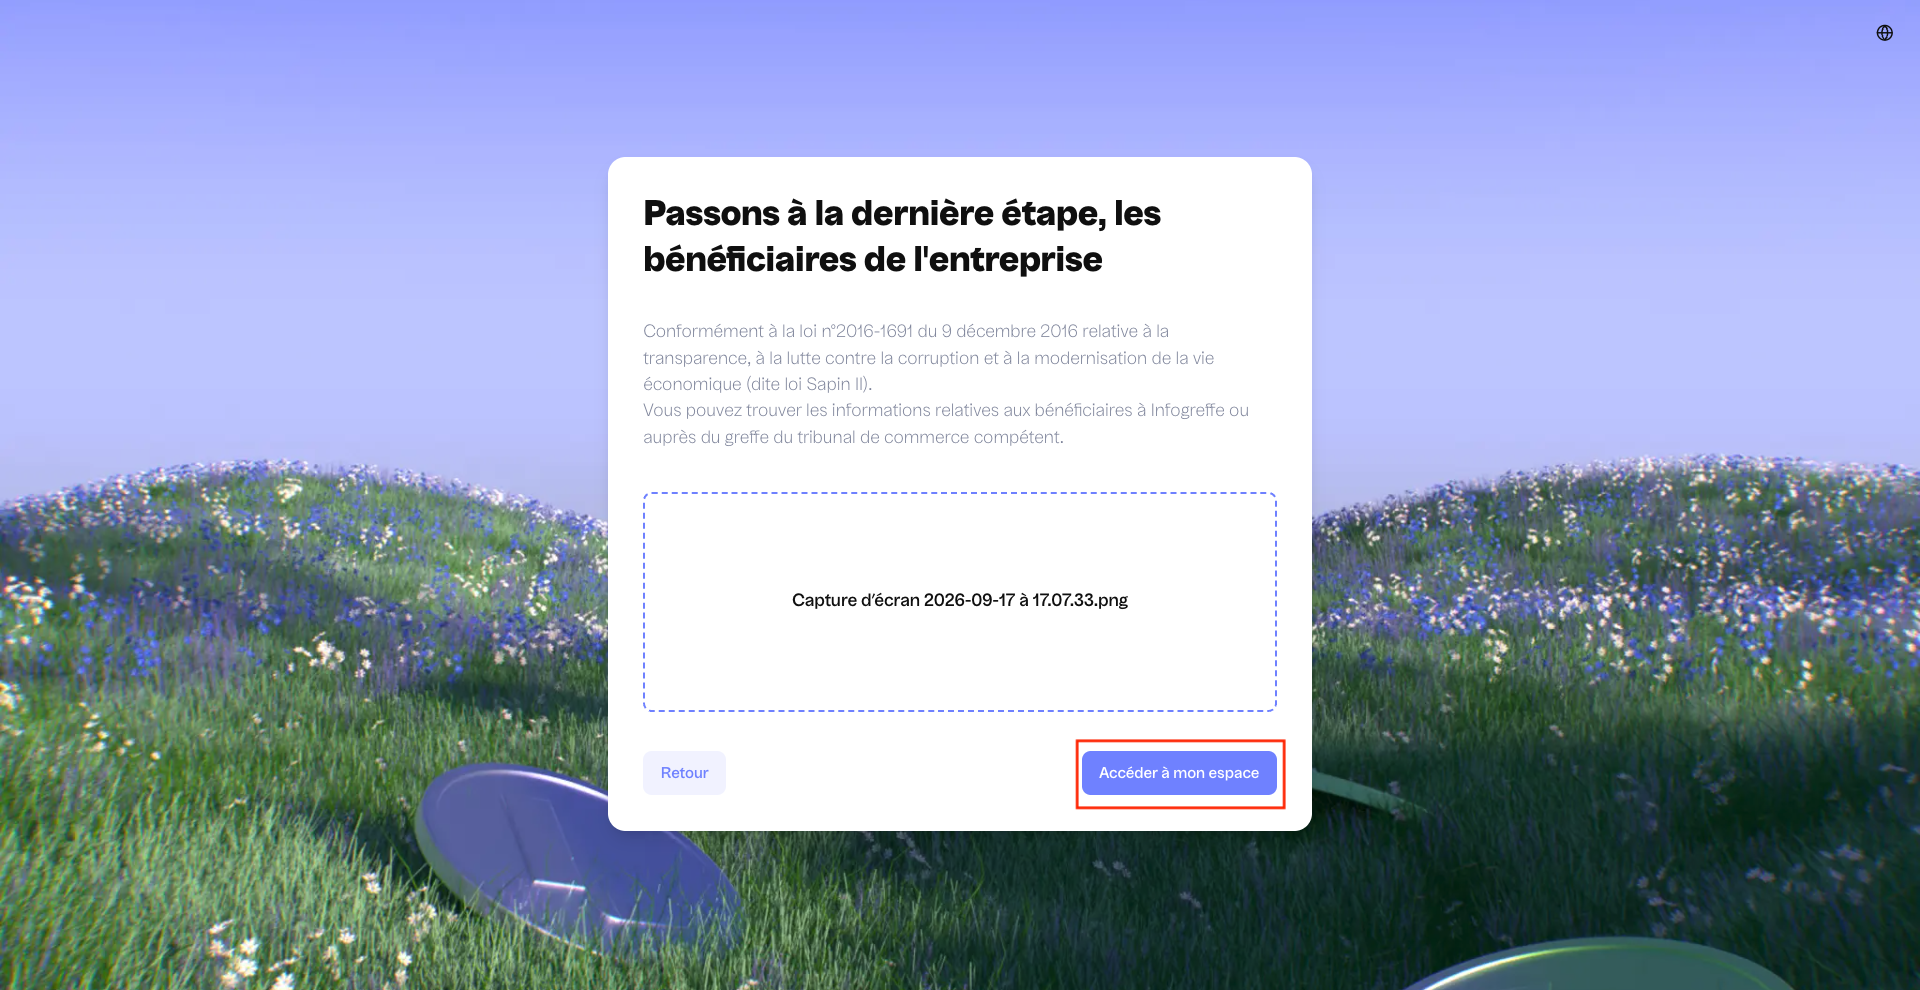
Finally, you need to download your Register of Ultimate Beneficial Owners to definitively access your personal space.

<figure><img src="https://2899979654-files.gitbook.io/~/files/v0/b/gitbook-x-prod.appspot.com/o/spaces%2FwaQosSnszpcHR9Zimu5R%2Fuploads%2Fgit-blob-f7580a9a612fa5df8f6e26d68444ca7320b9de43%2FCapture%20d%E2%80%99e%CC%81cran%202026-09-17%20a%CC%80%2017.12.57.png?alt=media" alt=""><figcaption></figcaption></figure>

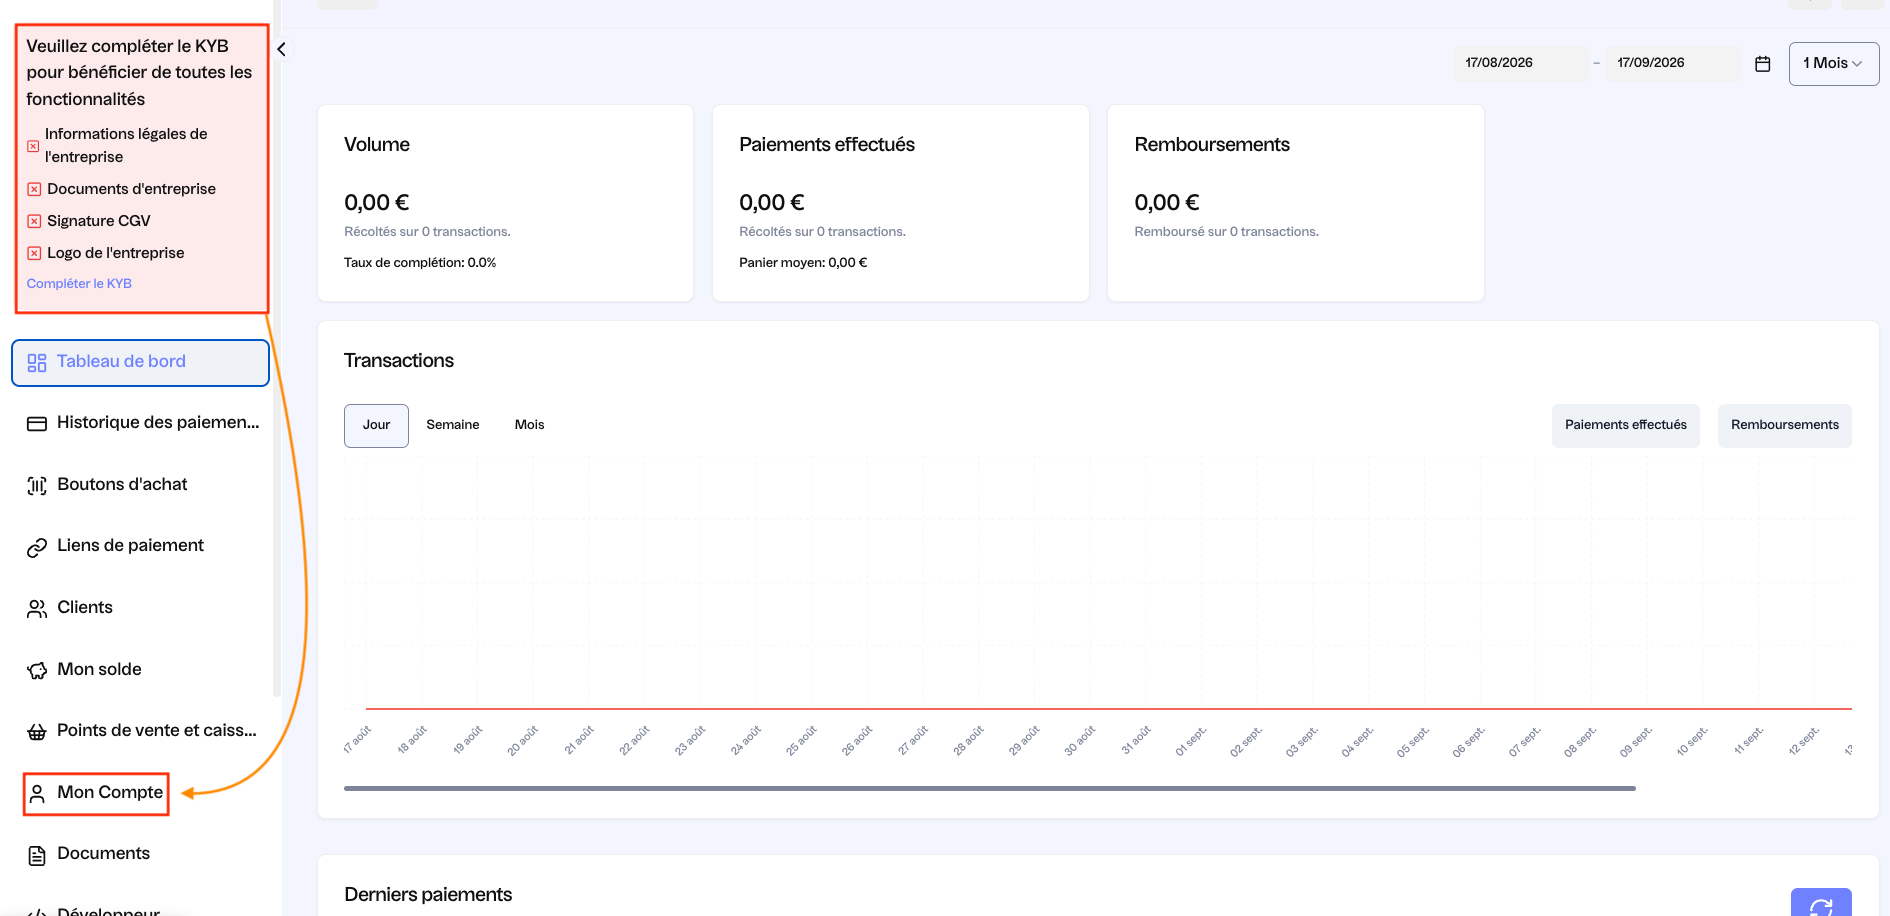
You are now on your personal space. Before going further, you must absolutely complete the KYB (Know Your Business) including the company's legal information, company documents, signature of general terms and conditions and logo. To do this, click on "My Profile" at the bottom left of your screen (see orange arrow).

<figure><img src="https://2899979654-files.gitbook.io/~/files/v0/b/gitbook-x-prod.appspot.com/o/spaces%2FwaQosSnszpcHR9Zimu5R%2Fuploads%2Fgit-blob-c2233921b69a38c27cb8c91ab6a8408f0f738b0e%2FCapture%20d%E2%80%99e%CC%81cran%202026-09-17%20a%CC%80%2017.17.32.png?alt=media" alt=""><figcaption></figcaption></figure>

\
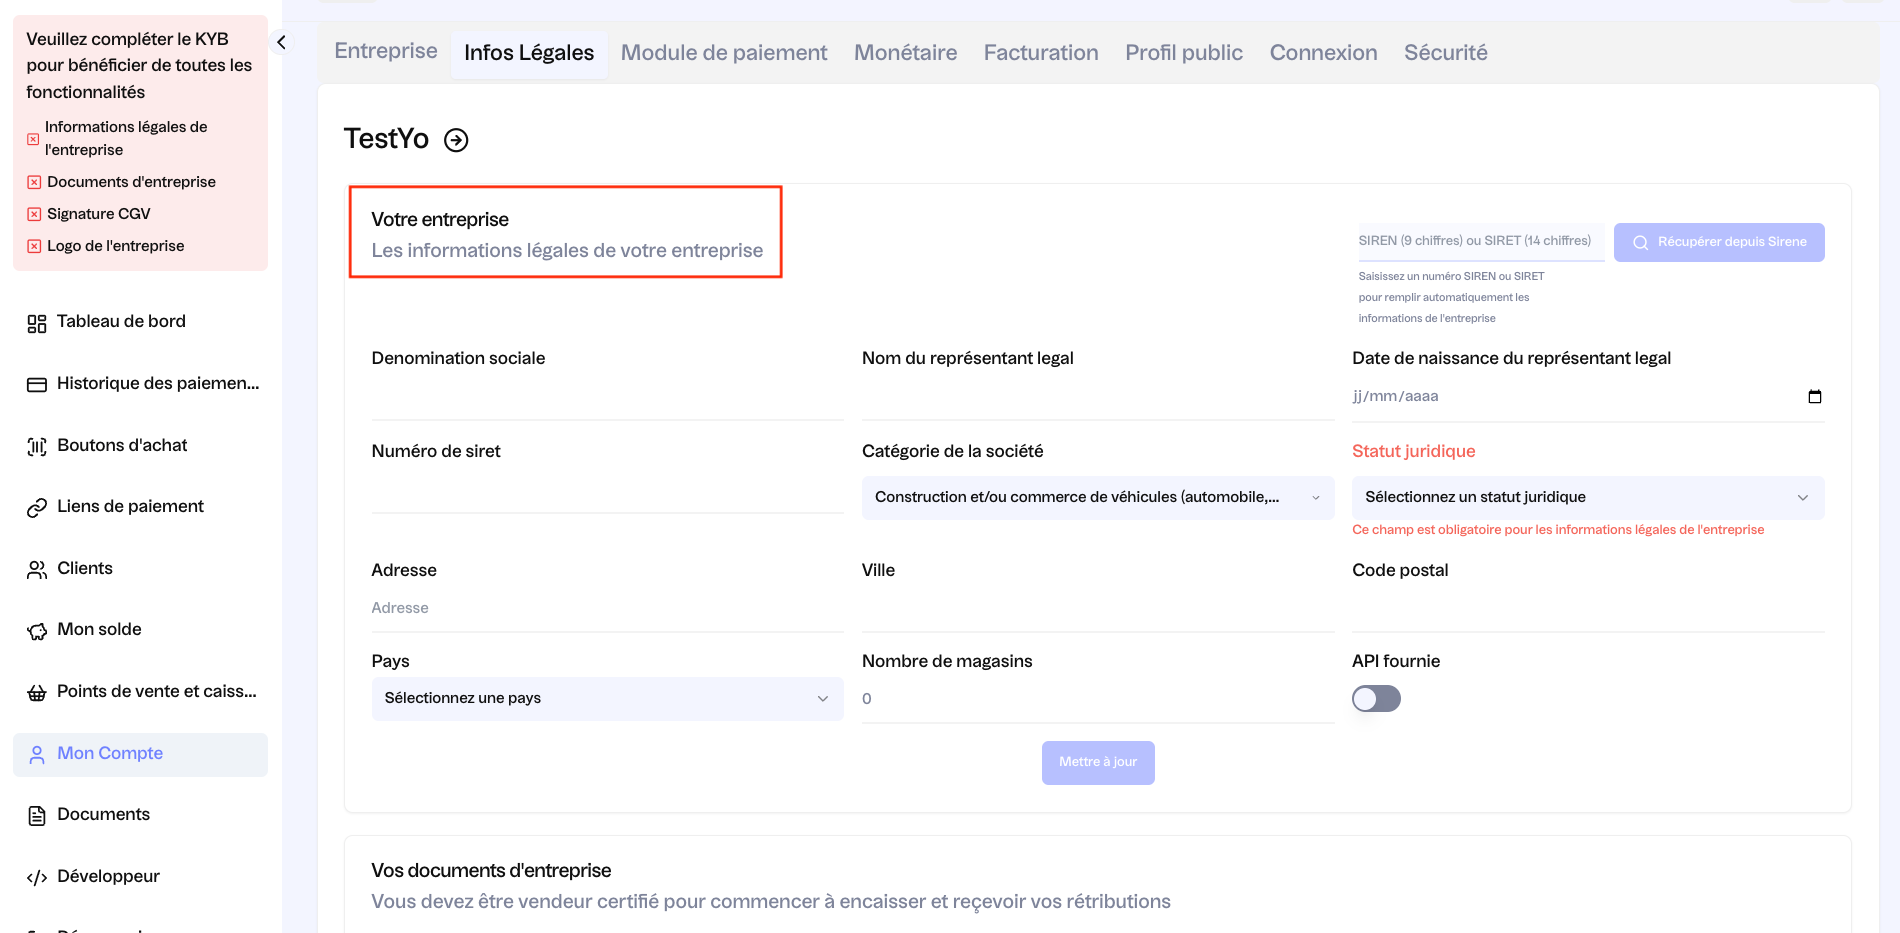
Once in "My Profile", you will be able to complete your account configuration. This is where you will confirm the following elements:

* First name, last name, date of birth, email and phone
* Your company category
* Your brand name
* Whether your company is attached to an entity or not
* Don't forget to select the country where you operate
* The address
* Your company status
* The SIRET
* The IBAN
* Contact name (email and phone)
* Your company website

<figure><img src="https://2899979654-files.gitbook.io/~/files/v0/b/gitbook-x-prod.appspot.com/o/spaces%2FwaQosSnszpcHR9Zimu5R%2Fuploads%2Fgit-blob-18d5d6f42fbbcaa869562b61ab2f5bba343703bb%2FCapture%20d%E2%80%99e%CC%81cran%202026-09-17%20a%CC%80%2017.16.50.png?alt=media" alt=""><figcaption></figcaption></figure>

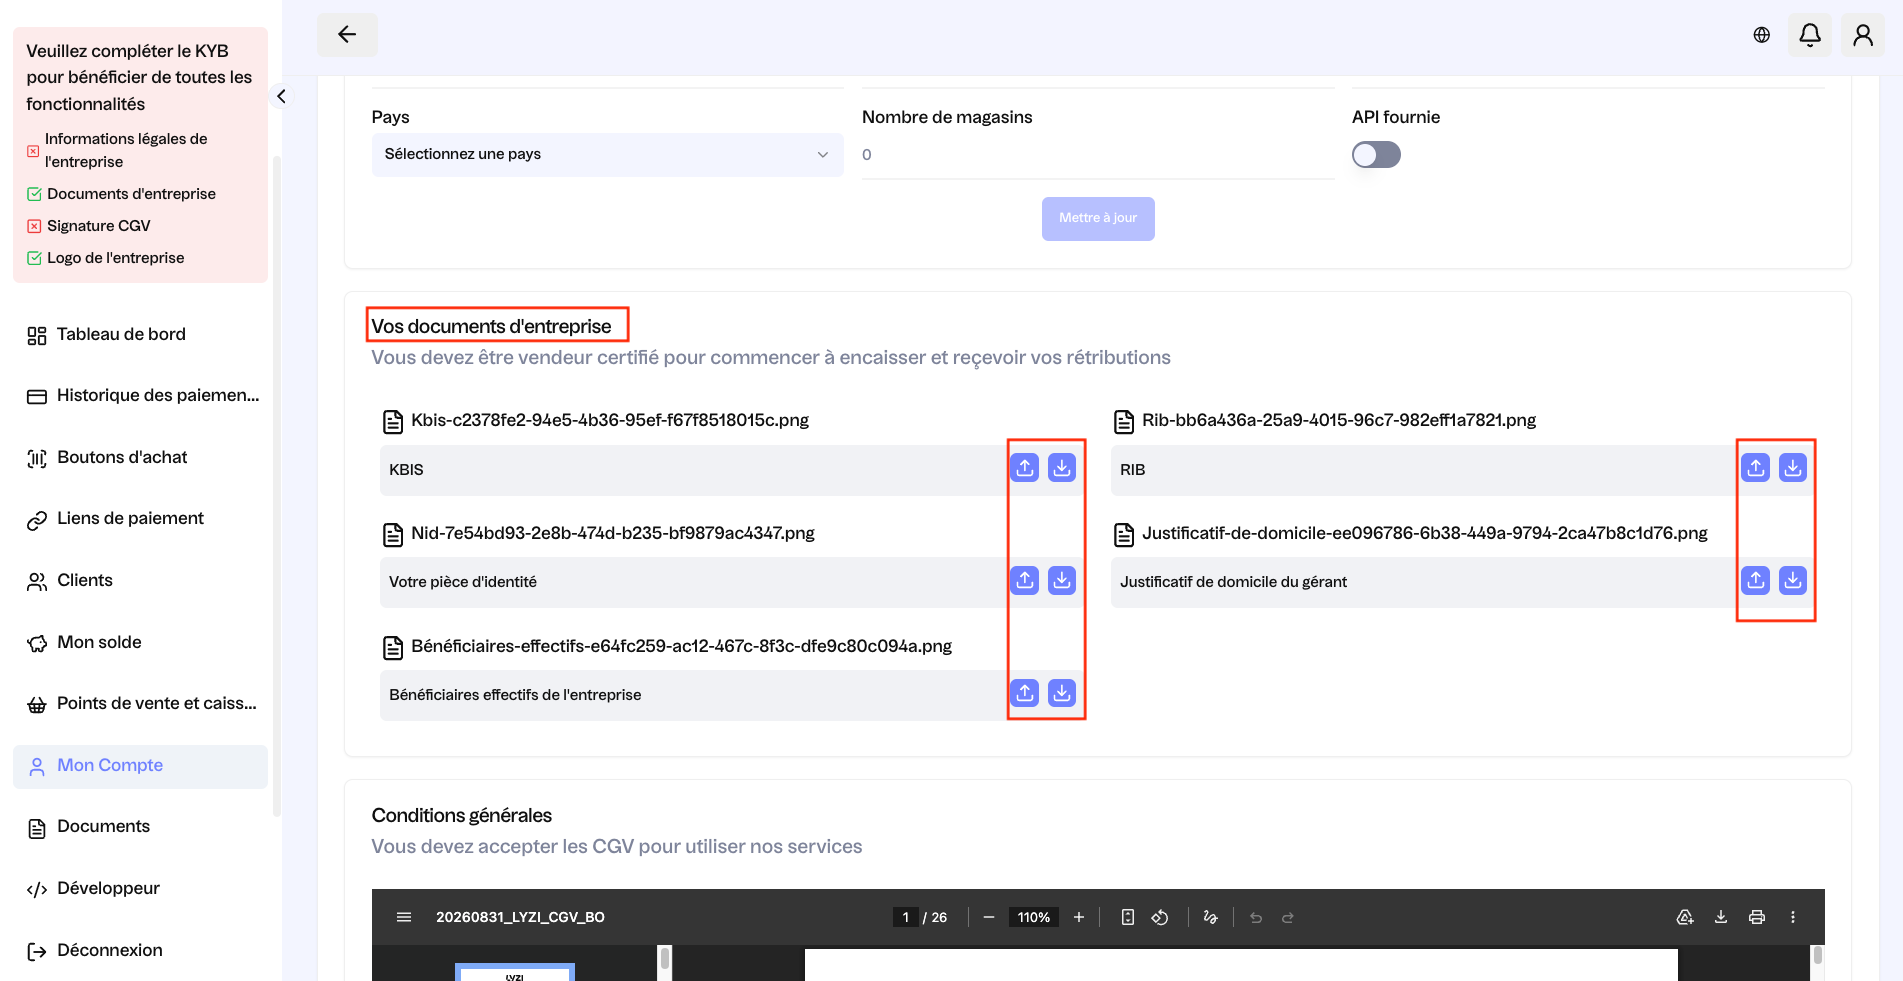
Lower down on the same page, you have access to your company documents. This is where you can download, view and modify them.

<figure><img src="https://2899979654-files.gitbook.io/~/files/v0/b/gitbook-x-prod.appspot.com/o/spaces%2FwaQosSnszpcHR9Zimu5R%2Fuploads%2Fgit-blob-c66ae7af49f2a1749b6af6de1d686def1519105c%2FCapture%20d%E2%80%99e%CC%81cran%202026-09-17%20a%CC%80%2017.21.44.png?alt=media" alt=""><figcaption></figcaption></figure>

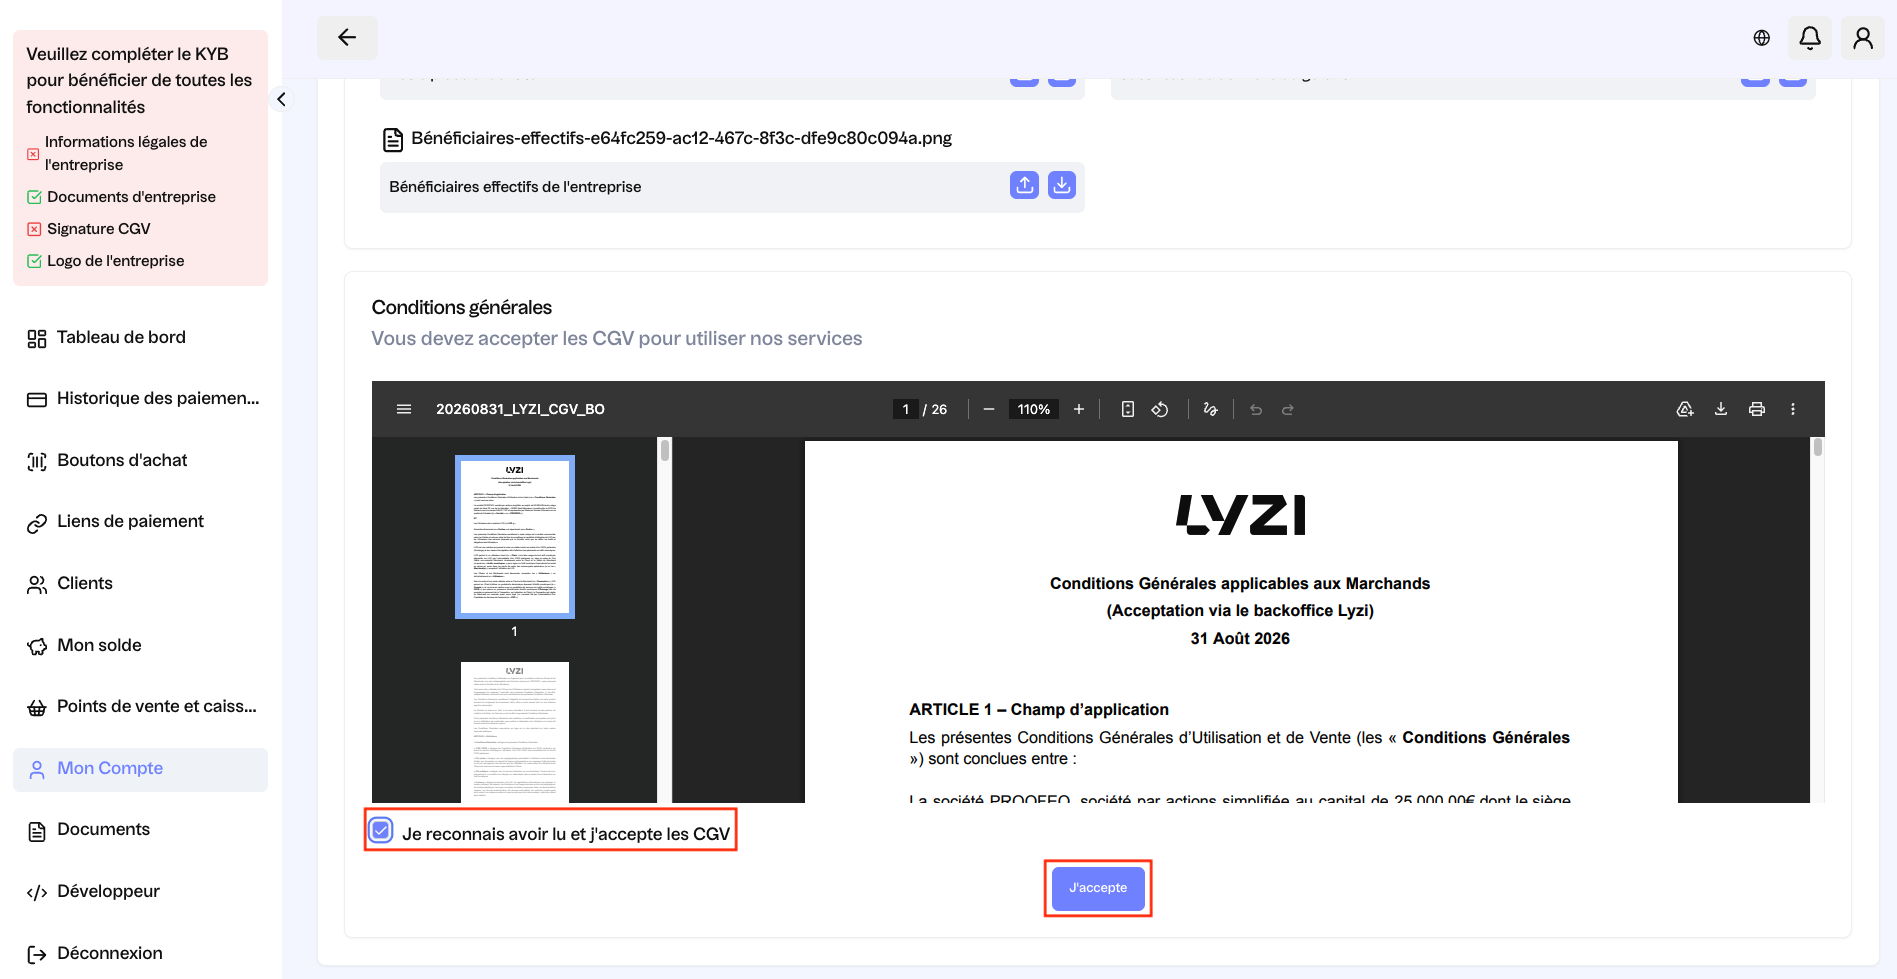
As indicated, at the bottom of the page, after the company information and legal documents, you will find the T\&Cs to accept. As you progress through the steps on your left at the top, completed steps are shown in green and others in red.

<figure><img src="https://2899979654-files.gitbook.io/~/files/v0/b/gitbook-x-prod.appspot.com/o/spaces%2FwaQosSnszpcHR9Zimu5R%2Fuploads%2Fgit-blob-cba50c5536dd2b311a27ded91ee35b413a2d156b%2FCapture%20d%E2%80%99e%CC%81cran%202026-09-17%20a%CC%80%2017.22.50.png?alt=media" alt=""><figcaption></figcaption></figure>

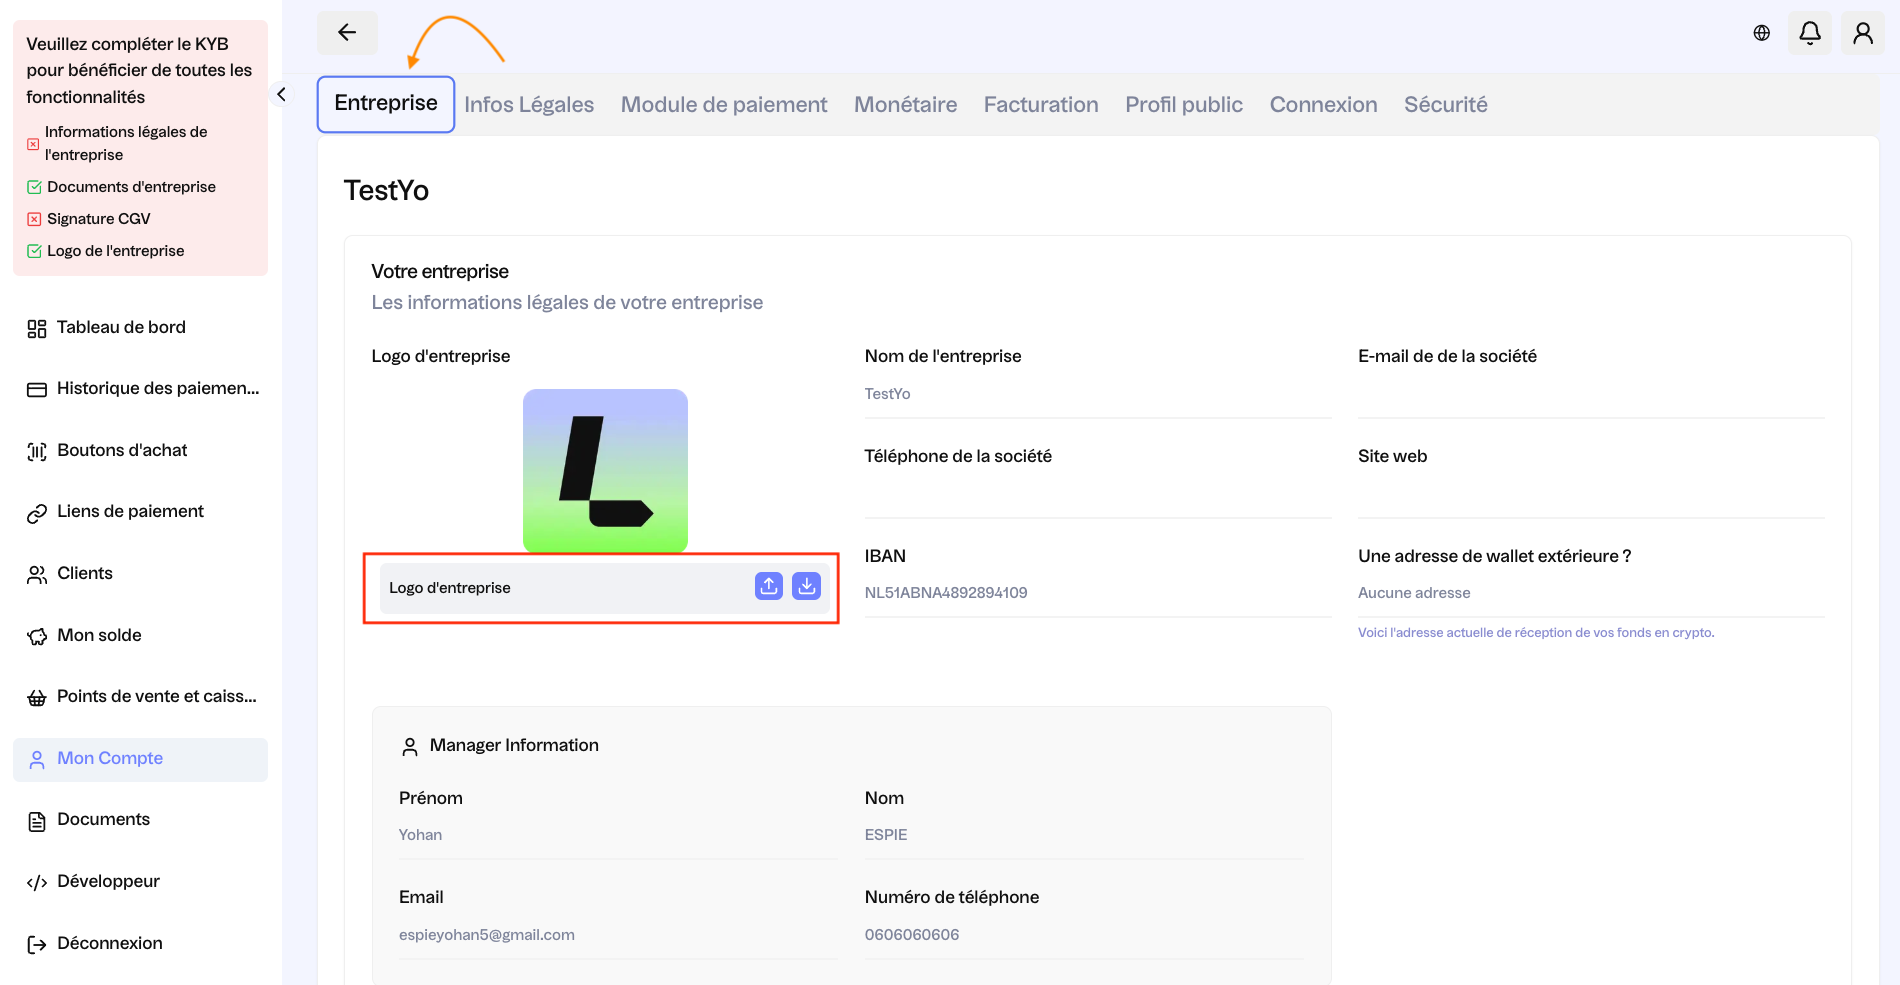
After configuring all the information about your company, you go to "Company" to add your logo (see red box).

<figure><img src="https://2899979654-files.gitbook.io/~/files/v0/b/gitbook-x-prod.appspot.com/o/spaces%2FwaQosSnszpcHR9Zimu5R%2Fuploads%2Fgit-blob-1cb3b40a6565a8e7986e350cc5a1a21a527c2527%2FCapture%20d%E2%80%99e%CC%81cran%202026-09-17%20a%CC%80%2017.24.22.png?alt=media" alt=""><figcaption></figcaption></figure>

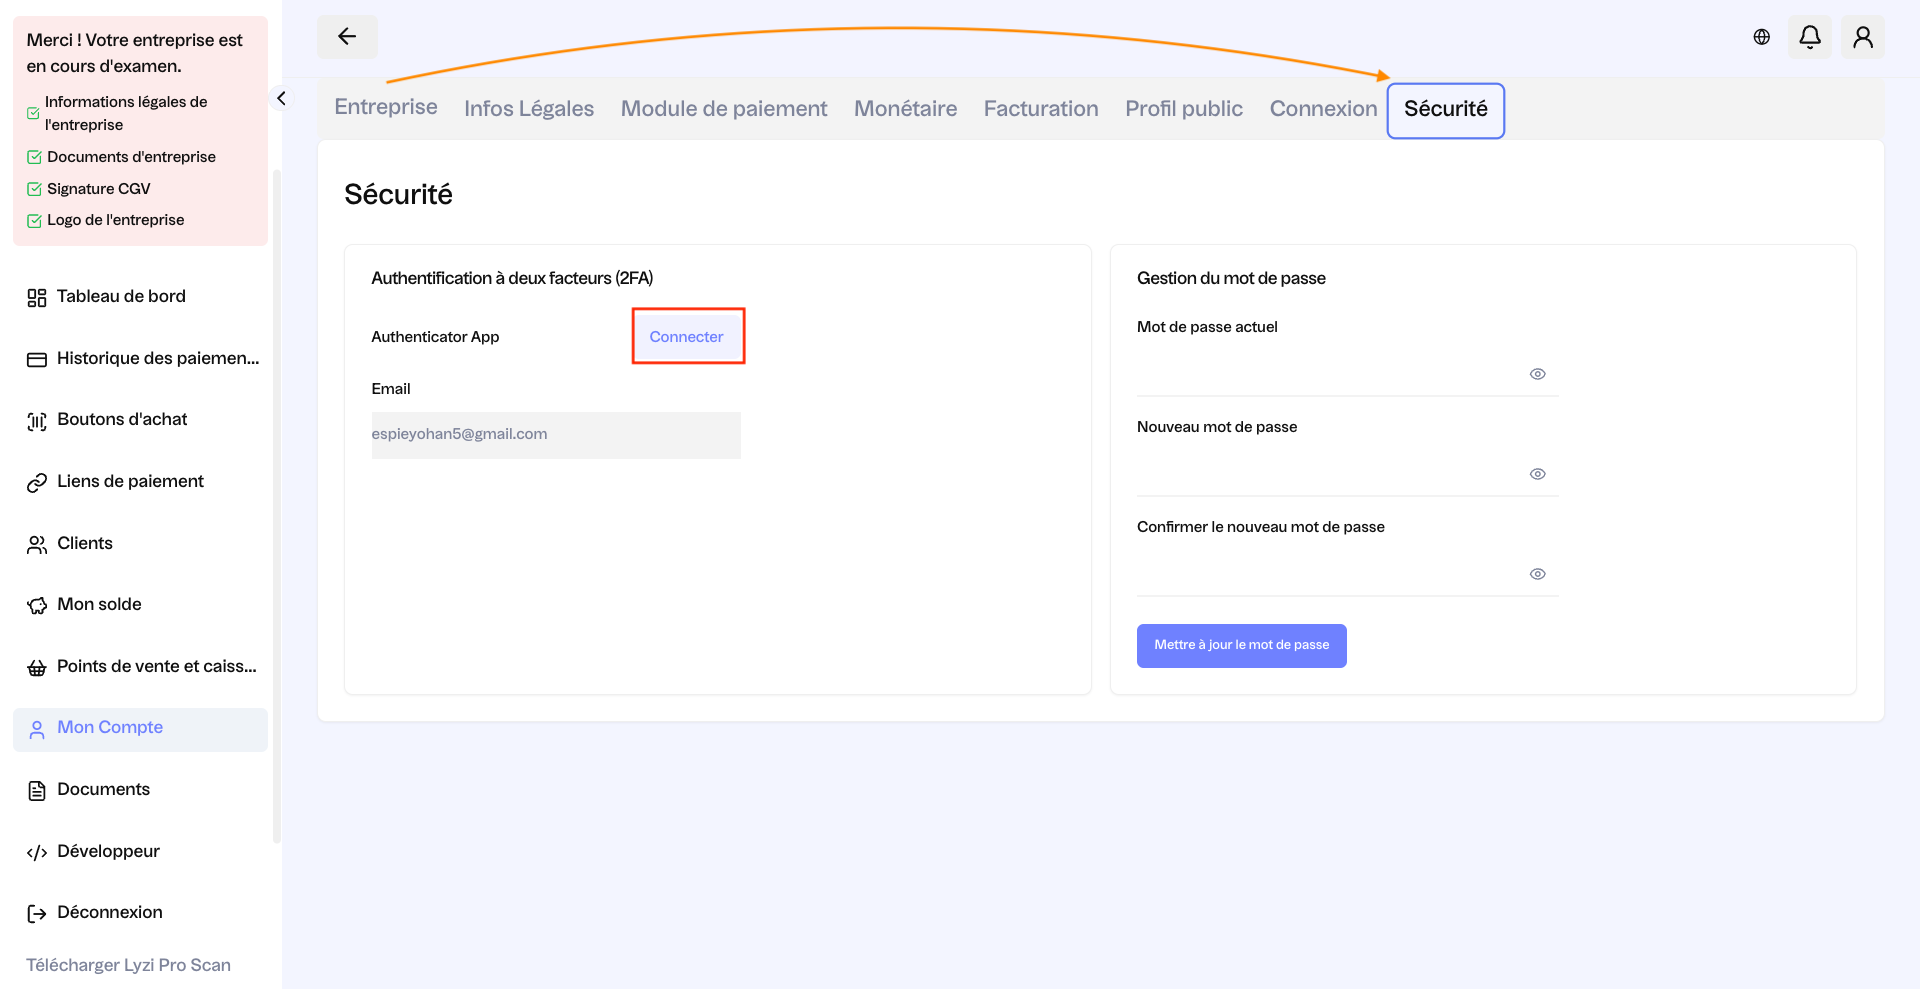
At each connection you will receive a confidential 6-digit code on your email valid for 5 minutes. In the security tab (see orange arrow), you can also configure your 2FA by clicking "Connect" (see red box). To do this, start by downloading the AUTHENTICATOR app on your IOS or ANDROID smartphone.

<figure><img src="https://2899979654-files.gitbook.io/~/files/v0/b/gitbook-x-prod.appspot.com/o/spaces%2FwaQosSnszpcHR9Zimu5R%2Fuploads%2Fgit-blob-eb77fed37d1639237a5ae8635f1fdc9027841f2c%2FCapture%20d%E2%80%99e%CC%81cran%202026-09-17%20a%CC%80%2017.28.45.png?alt=media" alt=""><figcaption></figcaption></figure>

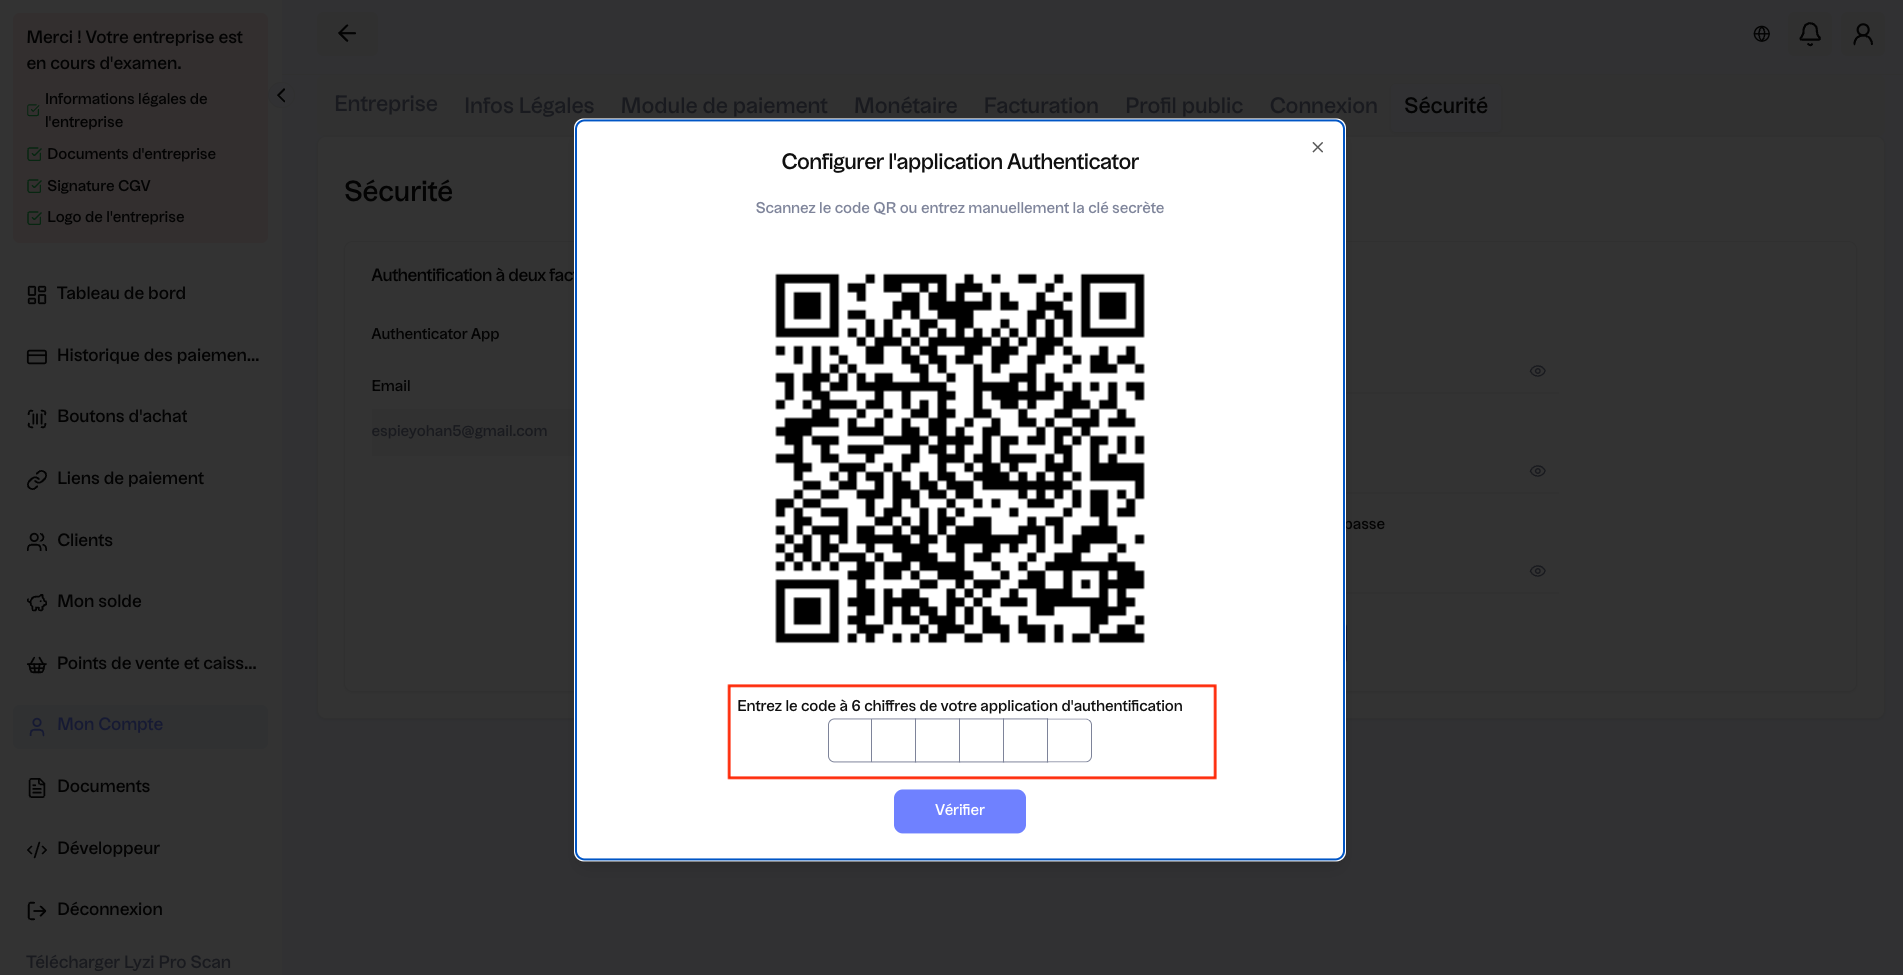
Then, you can scan the generated QR code with your Authenticator app to configure. At each new connection, you just need to open the Authenticator app and enter the 6-digit code associated with your account.

<figure><img src="https://2899979654-files.gitbook.io/~/files/v0/b/gitbook-x-prod.appspot.com/o/spaces%2FwaQosSnszpcHR9Zimu5R%2Fuploads%2Fgit-blob-342c75472b643081aff17187f291e97d98d93125%2FCapture%20d%E2%80%99e%CC%81cran%202026-09-17%20a%CC%80%2017.29.56.png?alt=media" alt=""><figcaption></figcaption></figure>

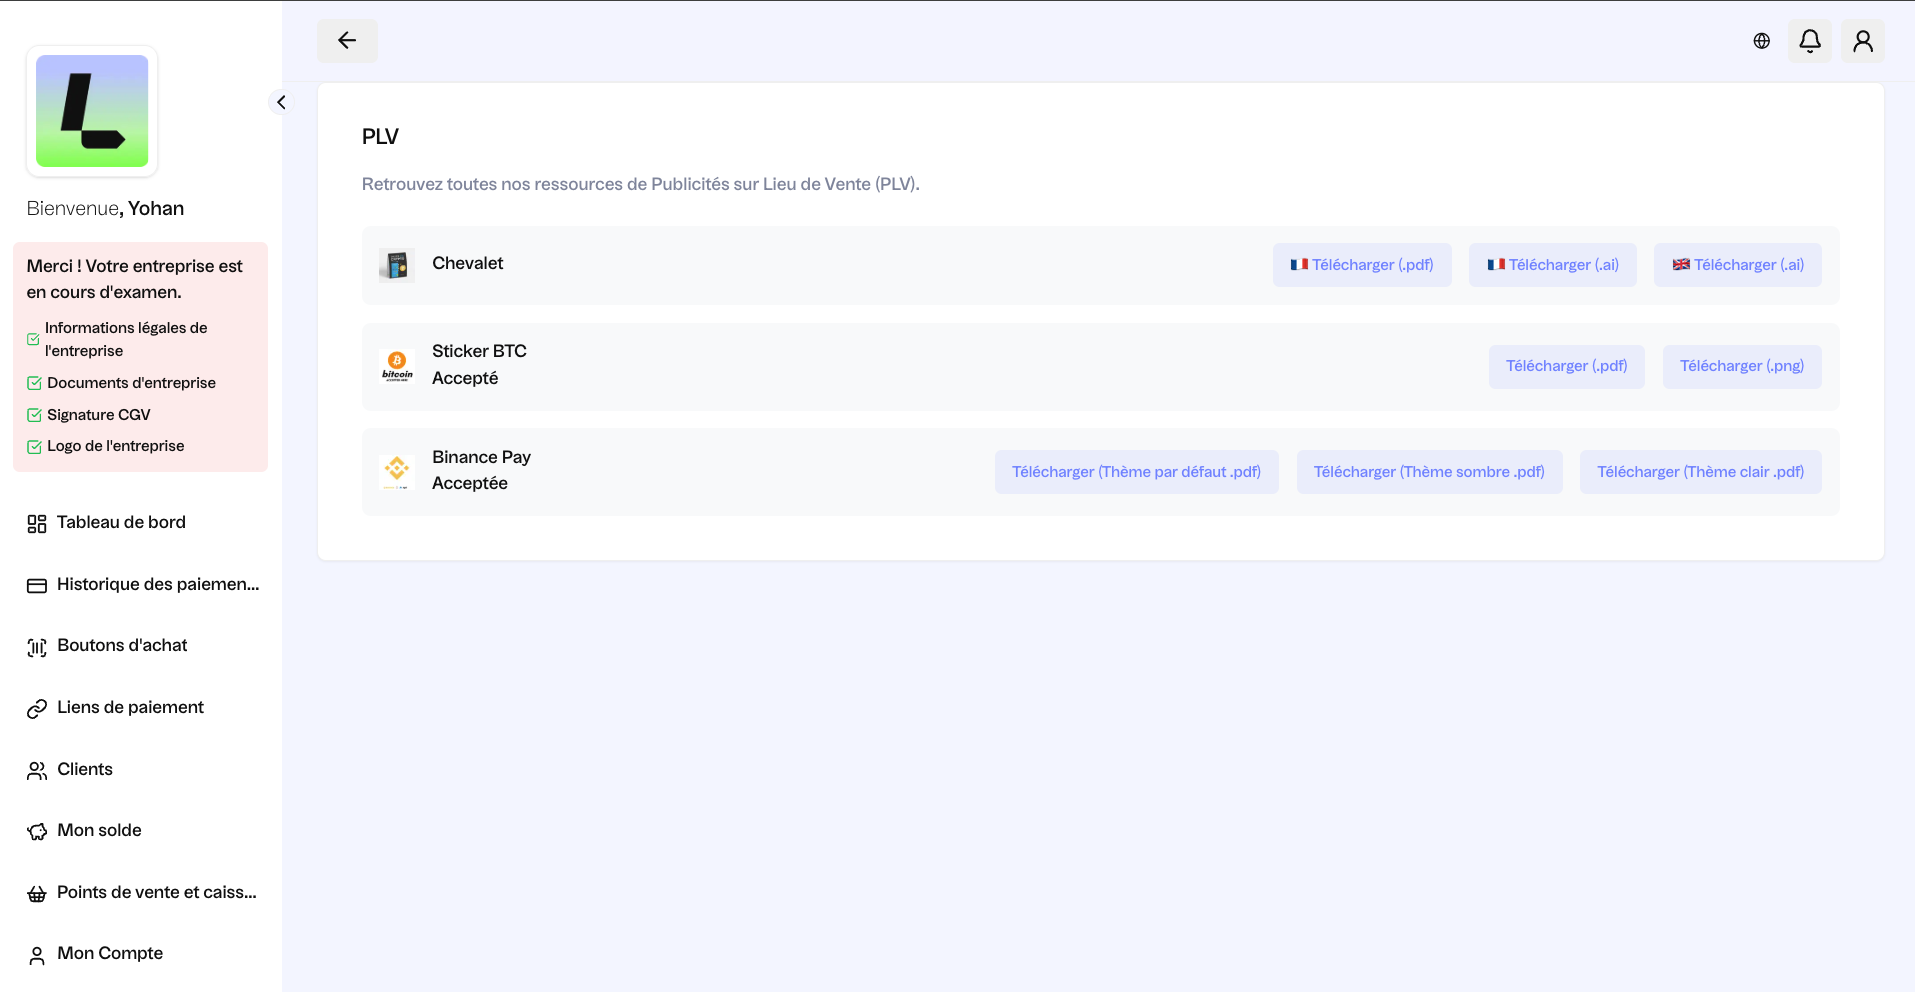
On your account, in the "Communication" tab, you will find your point-of-sale advertising resources (PLV)

<figure><img src="broken://files/2LvDmsgH9RGiMCy9scGB" alt=""><figcaption></figcaption></figure>

<figure><img src="https://2899979654-files.gitbook.io/~/files/v0/b/gitbook-x-prod.appspot.com/o/spaces%2FwaQosSnszpcHR9Zimu5R%2Fuploads%2Fgit-blob-3a82721d1e730918594fdd342cdcd9fb67d6c91c%2FCapture%20d%E2%80%99e%CC%81cran%202026-09-17%20a%CC%80%2017.50.53.png?alt=media" alt=""><figcaption></figcaption></figure>

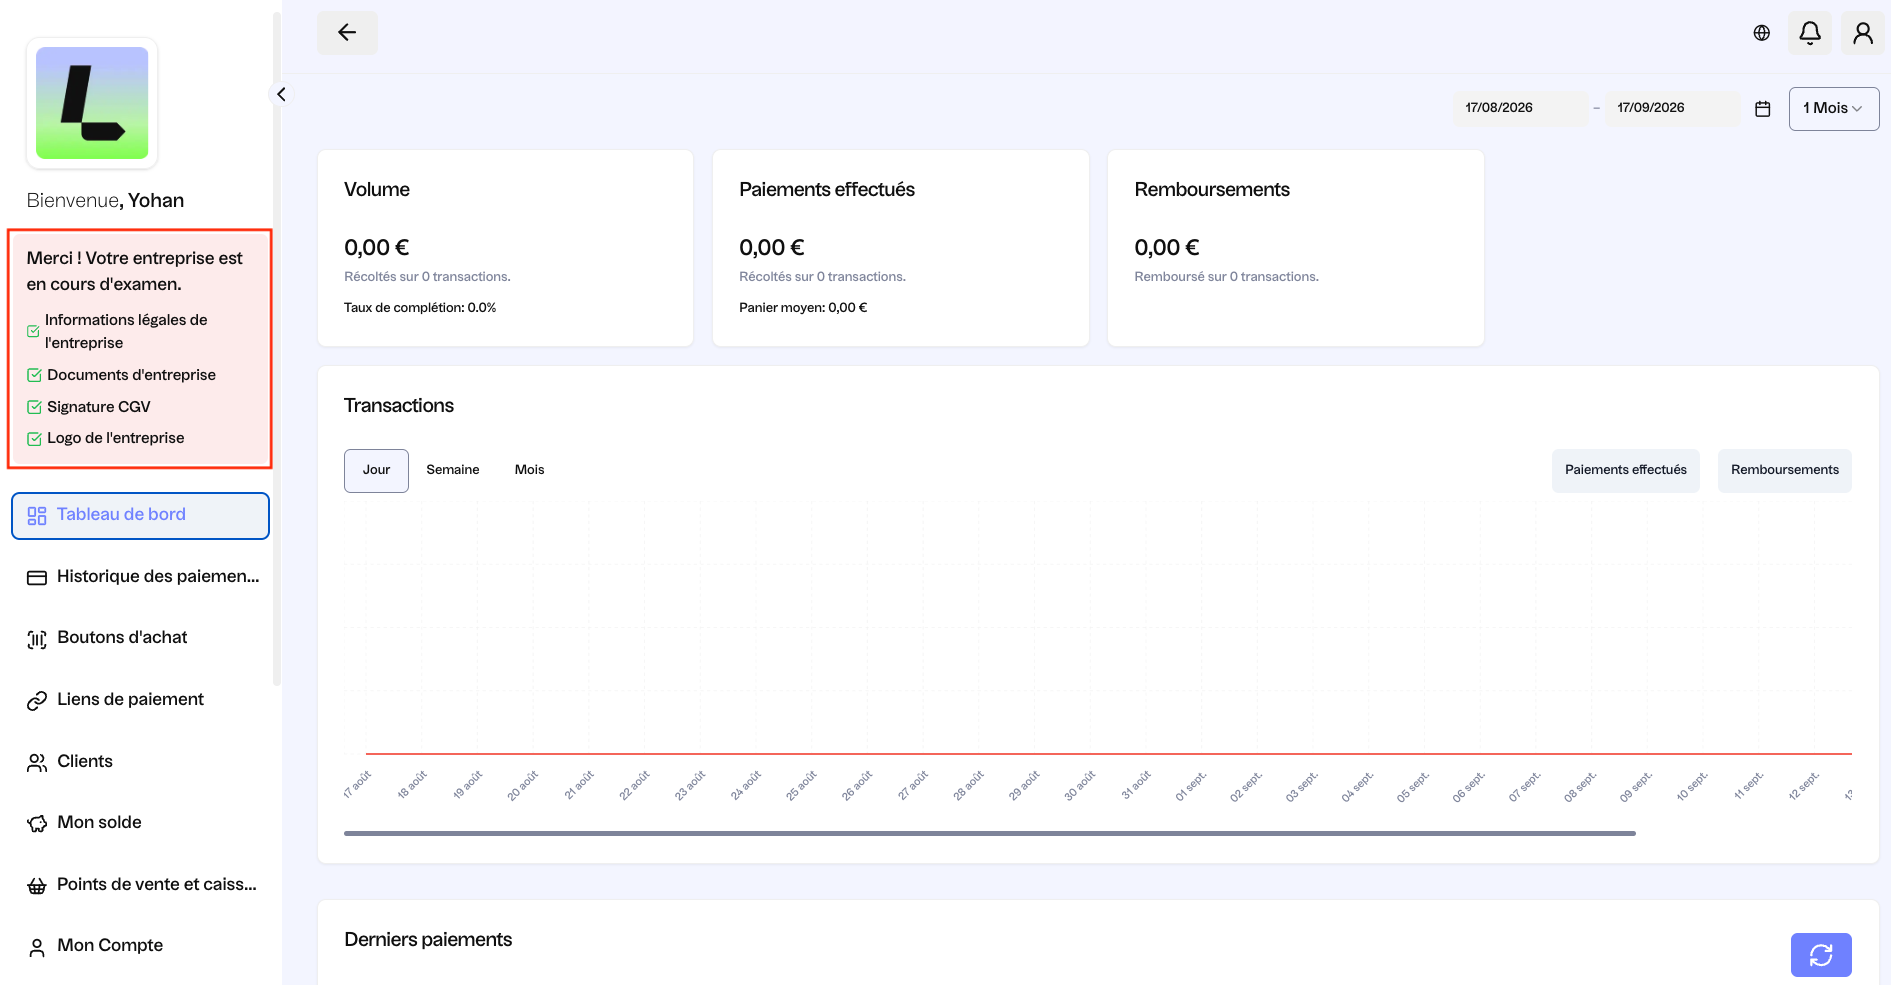
After all these steps, your account is almost configured. Your company is currently under verification. As you can see, the 4 steps are checked in green, which means they are validated on your side and you have completed your configuration (see purple box).

<figure><img src="https://2899979654-files.gitbook.io/~/files/v0/b/gitbook-x-prod.appspot.com/o/spaces%2FwaQosSnszpcHR9Zimu5R%2Fuploads%2Fgit-blob-1a625bb844f3542df04a68eb32cb3a8104612193%2FCapture%20d%E2%80%99e%CC%81cran%202026-09-17%20a%CC%80%2017.32.47.png?alt=media" alt=""><figcaption></figcaption></figure>

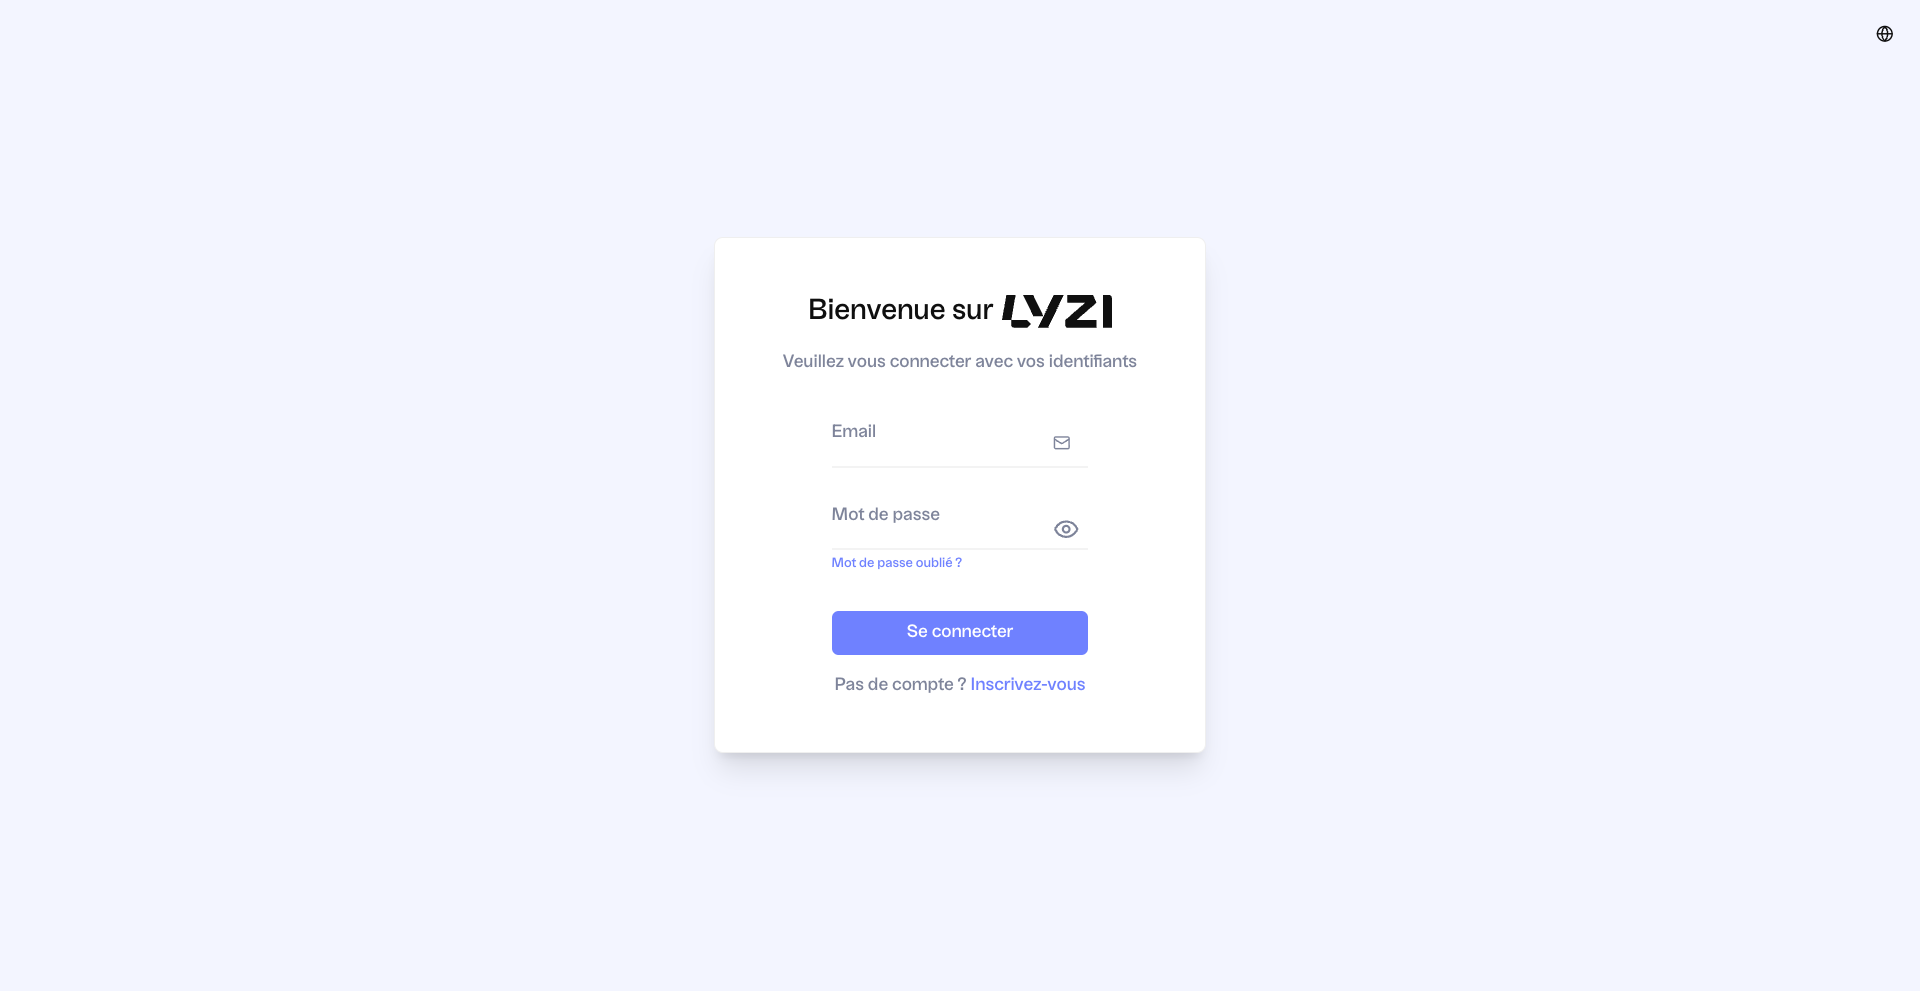
Once your company is approved, you can connect via the following link: <https://admin.lyzi.io/>. Then connect with your email address and password.

<figure><img src="https://2899979654-files.gitbook.io/~/files/v0/b/gitbook-x-prod.appspot.com/o/spaces%2FwaQosSnszpcHR9Zimu5R%2Fuploads%2Fgit-blob-ba3d149c0df6f80d4eb869c98e3b06416244b9e9%2FCapture%20d%E2%80%99e%CC%81cran%202026-09-17%20a%CC%80%2017.35.16.png?alt=media" alt=""><figcaption></figcaption></figure>

When you are connected, you will be able to add a point of sale, add a cash register and activate the cash register. After that, you'll be ready to collect in crypto. From your dashboard, click on "Point of Sale and Cash Registers" to create a point of sale and assigned cash register (see red box).

<figure><img src="https://lh7-rt.googleusercontent.com/docsz/AD_4nXe0dwSVjPekzCHZFFUC0z-u6PRno3D3Lrm8FNA-X4nqYPzKBlYo0xrWx4wvY9d9IqRBlJM05w_et5Ucm_dxIJa8Nci4iCBZAs-HbVRFqt82pWuOZaGpHRUP107A8WwREKONjsN3?key=cVUvhhbuJFoAyAP2rjDZwA" alt=""><figcaption></figcaption></figure>

After clicking, you are automatically redirected to this page. Go to "Add a point of sale" (see red box) to add your point of sale.

<figure><img src="https://lh7-rt.googleusercontent.com/docsz/AD_4nXfpDMgLFrko9MCg8GS9c5gln2H7heODtrJ-Q-4CFifjZJlfz8xRsCwY9XQaWL58oXePdXwDOZU0ThN-FcdAKrgPY5q9ksiihAtqskFREDH9mj0jIY0jixMtDGsJS9SC--ZcQ4ovVw?key=cVUvhhbuJFoAyAP2rjDZwA" alt=""><figcaption></figcaption></figure>

To add your point of sale, you can register your address at the top of the page (see red box). You can also manually register your address by indicating the address, city, country and postal code.

Finally, don't forget to name your point of sale (see green box). For example: company name, store name, etc.

Finally, click "Create point of sale" at the bottom of your screen.

(Your point of sale appears on the Map on your right).

<figure><img src="https://lh7-rt.googleusercontent.com/docsz/AD_4nXerFsRDnSPlnOoBeqO2Gqu2vHeXKDLuRR0uVy69nC3eDs3FJfe6DjKq95g7OG-YqfhXyFk2WBLZ-3QOgKUw8wYEY2l_dq4Bwj5ViNqlgdps2Qwt8X9Av-rDQ6MwHs5SF4p806aH2A?key=cVUvhhbuJFoAyAP2rjDZwA" alt=""><figcaption></figcaption></figure>

Your point of sale appears this way (see red box).

<figure><img src="https://2899979654-files.gitbook.io/~/files/v0/b/gitbook-x-prod.appspot.com/o/spaces%2FwaQosSnszpcHR9Zimu5R%2Fuploads%2Fgit-blob-b129b01a9095061c464a5ee8d0606c82c423ec61%2FCapture%20d%E2%80%99%C3%A9cran%202025-07-15%20%C3%A0%2010.21.11.png?alt=media" alt=""><figcaption></figcaption></figure>

The next step is to add a cash register then assign it to the point of sale. To add a cash register, you switch to "Cash Register" then click "Add a cash register".

<figure><img src="https://lh7-rt.googleusercontent.com/docsz/AD_4nXf_Ubq7vI48oNalpF4YRLcjzle-1t9kEYiopmk-gGZMPc2tdZATTxYLiJB3bryXqpgSTMQvznMknZFxqXsV7WZE_JGD0dHqY-TT9CkWjLsOKhbPBN2lcM3IRtsIkP5kcVCnkQz_QA?key=cVUvhhbuJFoAyAP2rjDZwA" alt=""><figcaption></figcaption></figure>

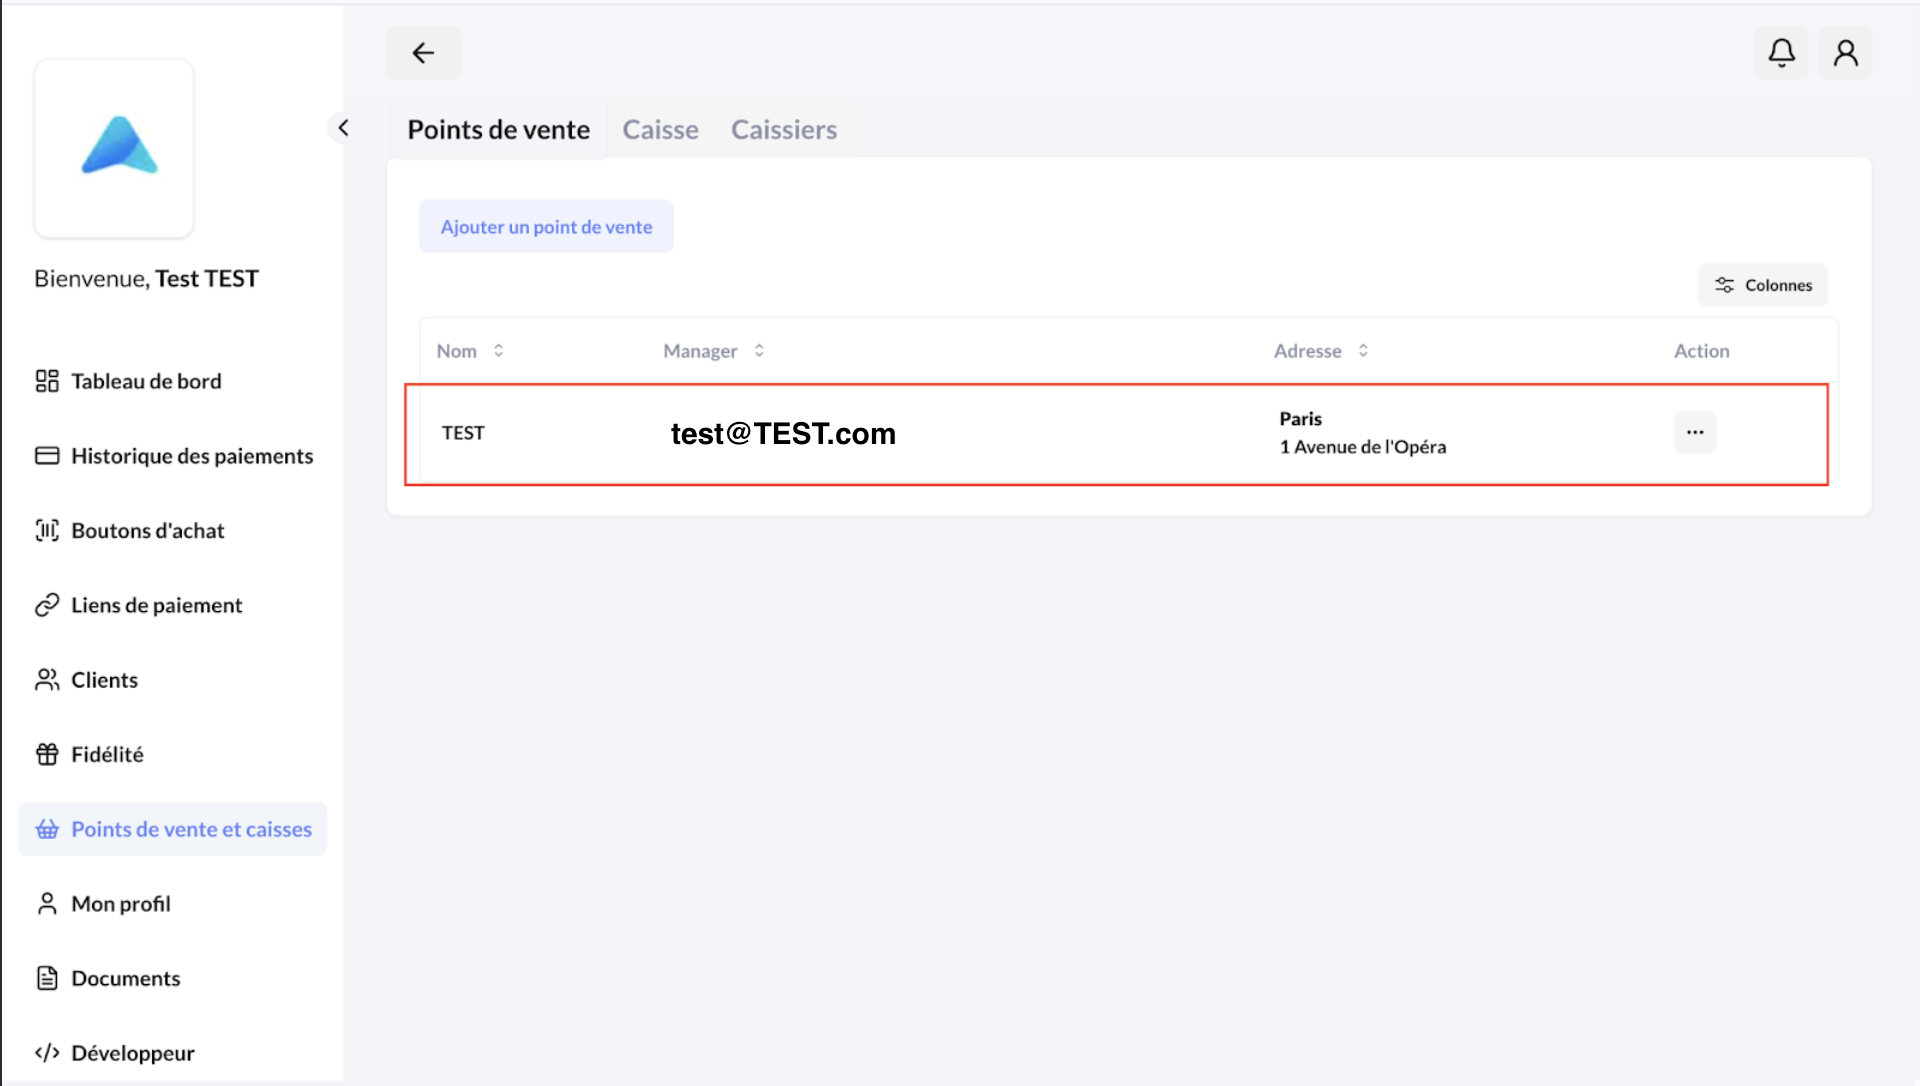
To add the cash register, it is essential to select the point of sale associated with the cash register (as in the example where TEST is selected, referring to the name of my point of sale).

<figure><img src="https://lh7-rt.googleusercontent.com/docsz/AD_4nXdrQLq8ECgr7gMfdA_EDMYI9yuKZrQaaIrQrmZSNBigDvpme3TL3pSdtvyBso95Xhn5gRipl9g788CBRtzy_z0rwg3GFDL_M3QfIVLUefRoHyK76tGQnacX5GyJrTzR3poPLd-P-Q?key=cVUvhhbuJFoAyAP2rjDZwA" alt=""><figcaption></figcaption></figure>

Your cash register then appears here (see red box).

<figure><img src="https://lh7-rt.googleusercontent.com/docsz/AD_4nXdZbaAgqN9dTdT7Z0i4h3fzBP4rXcCQcZ4Bnf15mJZTNPlYJjBptH3wSs4I4CC26t8bnAg5CEovxJSsM2FOJteV1VBT_vkZQNjz-b-yQSqRcW9i5SlYKNEhqYyOVplZ72xd1jxc?key=cVUvhhbuJFoAyAP2rjDZwA" alt=""><figcaption></figcaption></figure>

You then need to activate your cash register before starting to collect in cryptocurrencies. To do this, click the button on the right (see green arrow). You then have 3 options that appear (see red box):

1. **Synchronize with Lyzi ProScan app**
2. **Assign cashiers**
3. **Static collection QR code**

<figure><img src="https://lh7-rt.googleusercontent.com/docsz/AD_4nXdPoRnh5qN5UuGpJbIHRA9POMsy_CcjTsw7Rx1X9qTajRrdYZNHSxlT0KrshzkFRqbxAuypmQG8aqFdbrRQ6Fz_ciT1_HbqA4JQ3yGRXCTpEQe42izaM2ufLpAj_ZnW4yZH8pAA-w?key=cVUvhhbuJFoAyAP2rjDZwA" alt=""><figcaption></figcaption></figure>

**⇒ Synchronize with Lyzi ProScan app**

To synchronize with the Lyzi ProScan app, you must first download the app on your smartphone (IOS or ANDROID) or tablet or on your Android POS terminals or via Nepting (activation is done remotely).

Don't forget to display the dropdown menu indicated by "For which employee" to connect the cash register to your business before activating the cash register (see red box).

<figure><img src="https://lh7-rt.googleusercontent.com/docsz/AD_4nXeS9ffU9Kh-769hU7yC2Dgq8onoexX82-LlH6iPC68nsfc5E6n4WTkUMP-o_NX2UVkG0TS4NN499EMw8vKb5zIGFA6iTI8tQFO1U-Xn6yAVg_540fioSCN6kAiFo--fjBTo6032Kg?key=cVUvhhbuJFoAyAP2rjDZwA" alt=""><figcaption></figcaption></figure>

Once scanned, you have the option to enter an amount. This means it's operational. You can start collecting. Once the amount to pay is entered, show the QR code to the customer.

**⇒ Assign cashiers**

To assign cashiers, you must first create a cashier account (see red box).

<figure><img src="https://lh7-rt.googleusercontent.com/docsz/AD_4nXdwWunyIABsae6jM_NZG67HpJtShE8cro8w_uCvXa5WSrvRDW_avF5O9dJeDKYnBuLtJdw-nANNgYDo2v_bjoNj-XAG273Vs5l8OqpTItdS6sQkTj0iKRW_8yxyxw_x0bQH34aM?key=cVUvhhbuJFoAyAP2rjDZwA" alt=""><figcaption></figcaption></figure>

After clicking "Create a cashier account", you can complete the cashier account by filling in the cashier's first name, last name and email. Once finished, click "Create".

<figure><img src="https://lh7-rt.googleusercontent.com/docsz/AD_4nXcOjkKz2j-KNEnjezDwiBi8PO3BwYUKUqkYz6wqOTbkrPcsPNaf_Umx7e0oA733Z8sP2M8jS9kAlCTxgx_WNMzo5HQcYq_kP39jIxhKzdQ-XQOHHtjE4knWKdhzzvBm0yXi8PW8xQ?key=cVUvhhbuJFoAyAP2rjDZwA" alt=""><figcaption></figcaption></figure>

When you click on "Cashiers" (see red box), you can see the cashier account that was just created (see red box).

<figure><img src="https://lh7-rt.googleusercontent.com/docsz/AD_4nXd4Y76WTJZnyQR4mPAxOtILZlLqb4oZKHjZYjct84l5q-ElYxSxYQ0pI9lZDiWo-0rM5VjXMqudY2baH8yWeE7JNYD8pJxyNKPB-oELurx4J_SGEWblUN2E-gMgMEJkZebwu7v8GA?key=cVUvhhbuJFoAyAP2rjDZwA" alt=""><figcaption></figcaption></figure>

Once the cashier account is registered, you can assign it to your cash register.

To assign the cash register (once the cashier account(s) is/are created), you can select the specific cashier whose account was just created (see red box).

<figure><img src="https://lh7-rt.googleusercontent.com/docsz/AD_4nXdbb5Mg4EfUKwi-NXe3HApYQV4tJSR6Z_UlnYvGwHgKix46Egks0irHA_3RAR7JgvMH5cANehOPcvhfiElIxdfoxxQot_y0YYAEo8q-vUTxoR6JWWlllGDKO78dlgOE4D_akm__wg?key=cVUvhhbuJFoAyAP2rjDZwA" alt=""><figcaption></figcaption></figure>

Then, after selecting the cashier account to assign, you click "validate".


---

# Agent Instructions
This documentation is published with GitBook. GitBook is the documentation platform designed so that both humans and AI agents can read, navigate, and reason over technical content effectively. Learn more at gitbook.com.

## Querying This Documentation
If you need additional information that is not directly available in this page, you can query the documentation dynamically by asking a question.

Perform an HTTP GET request on the current page URL with the `ask` query parameter, and the optional `goal` query parameter:

```
GET https://docs.lyzi.io/en/merchant/onboarding.md?ask=<question>&goal=<endgoal>
```

`ask` is the immediate question: it should be specific, self-contained, and written in natural language.
`goal` is optional and describes the broader end goal you are ultimately trying to accomplish on behalf of the user. GitBook uses it to tailor the answer towards what is most useful for that goal.

The response will contain a direct answer to the question and relevant excerpts and sources from the documentation.

Use this mechanism when the answer is not explicitly present in the current page, you need clarification or additional context, or you want to retrieve related documentation sections.